For the 13 of you who 1) still use RSS feeds and 2) haven’t unsubscribed yet, boy have I got a deal for you.
Last week, I got a mailer from Midway and one of those items in there was the Hornady AR Gunlocker for $239. I have always been interested in vehicle mounted AR safes but usually they are in the $400 range, so I started looking around.
The original MSRP is around $350 on these. Amazon had them for $220. I decided to wait a couple of days until payday/allowance day (we still do Dave Ramsey and my “blow money” comes out of the wife’s biweekly check) to see if I still wanted it. I decided that I’d probably get it when the price dropped to around $200. By allowance day, it was $204 so I bought it.
The price is still dropping and my safe was delivered today.
It was $189 when I woke up this morning and now it’s $182 with prime shipping.
Those of you not running an adblocker can see the current price below:
Now, I just got it today and it’s still in the box so I can’t give a review yet, but for $184 (probably lower by the time you read this) I can make it work, even if I have to replace the electronics with something more useful. It may be too wide to fit in my cherokee but I can use it as an underbed safe or something.
I see that question a lot. The story basically goes something like this:
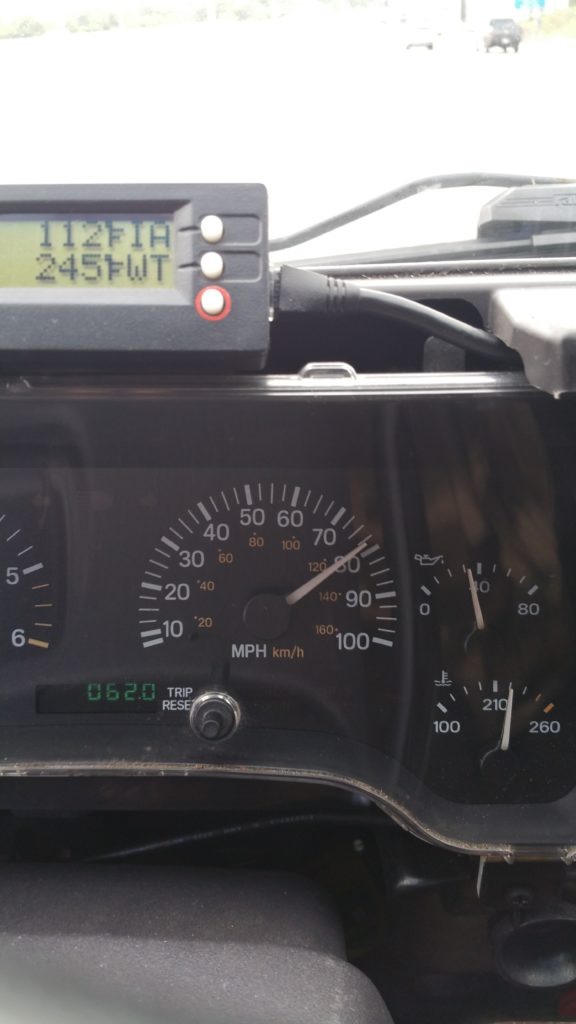
I was out on the interstate today, going about 75mph in 90 degree heat with the AC on full blast (probably with a lift, bigger tires, and stock gearing), and I noticed that my temp gauge was a little over 210. Close to the 220 mark. I know that normal operating temperature for my 4.0 is between 205 and 210, so I wasn’t all that concerned. Then all of a sudden my temp gauge spiked to 260, the instrument cluster beeped at me, and my check gauges light came on! What happened?
Well, what happened is that your instrument cluster temperature gauge is a dirty little liar, that’s what. And as far as I’m concerned, it’s the worst possible liar in that it doesn’t tell you how serious things are until you are well past time to take action. In other words, you were having problems looooooong before your check gauges light came on.
So let’s start off by talking about where that gauge gets its’ readings. In 1996 and older cherokees, there were actually two separate temperature sensors–one in the thermostat housing on the front of the engine, and another one in the back of the block. The front sensor was for the engine computer, and the rear sensor went straight to the temperature gauge in the instrument cluster. If you have one of those older cherokees, then the rest of this article doesn’t apply to you. In fact, I’d be shocked if you were having this “sudden overheating” problem in the first place.
In 1997 (or possibly 1996, since they were the first OBD2 XJs) they ditched the rear temperature sensor. In the 97-01 models, the engine computer (Powertrain Control Module, PCM) reads the resistance value from the engine coolant temperature sensor. The ECTS is an inexpensive sensor because it is essentially just a variable resistor that—wait for it—varies the amount of electrical resistance depending on what temperature it is.
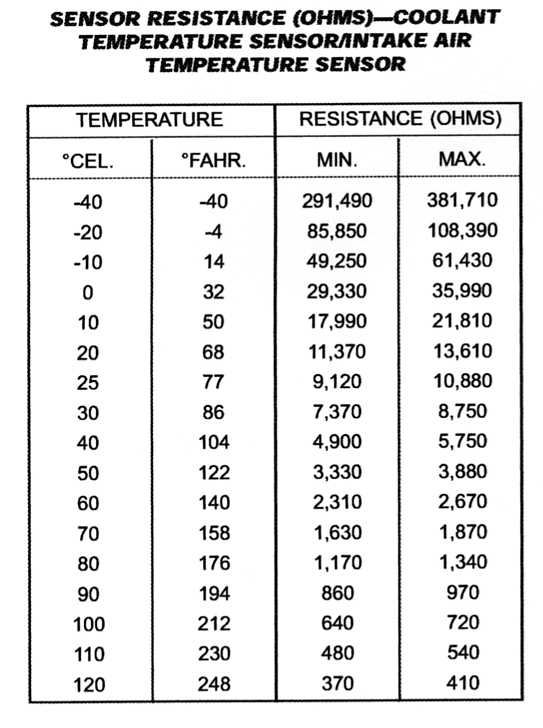
Here’s a handy chart that shows what the factory sensor’s resistance is at specific temperatures. You can use this chart to determine if your sensor is bad, by the way.
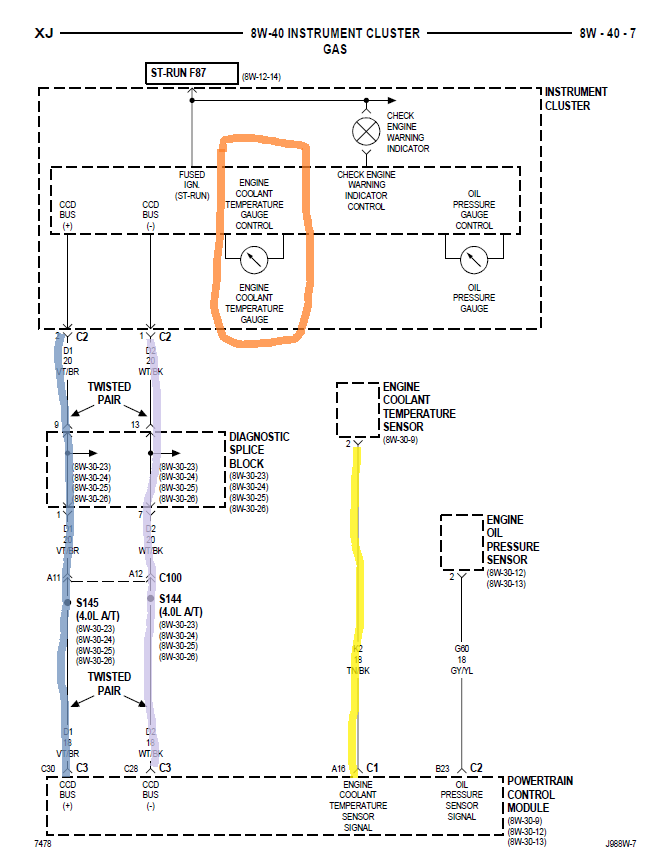
As I mentioned, that resistance is read by the Powertrain Control Module. The signal wire for the ECTS goes directly to the PCM. It goes nowhere else. It’s circuit K2 in the factory service manual, which you should buy right now if you don’t already have one.
The PCM then sends out the calculated temperature via the CCD bus. CCD is Chrysler’s intra-vehicle communications protocol, similar to CAN bus.
The instrument cluster reads this value off the CCD Bus. Here’s the diagram from the factory service manual that shows how this communication works:
As you can see, the temperature gauge in the instrument cluster has no direct communication with the ECTS. It only know the value that is put out by the PCM.
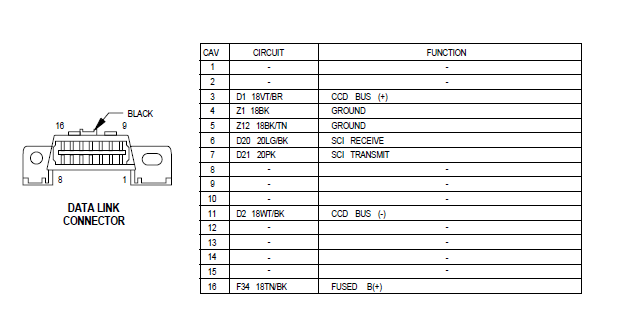
You know what else can read the value put out by the PCM? Every single OBD2 code reader on the planet. And as a bonus, with Chrysler vehicles (like the 97-01 XJ), it reads it off the CCD bus:
I bought a ScanGauge II in like 2005 and have used it extensively ever since. There are much better options out there today–like the UltraGauge–but I have it so I use it. If you just want something for this test, a cheapie OBD2 bluetooth adapter and a free app like Torque will do just as well.
Here are my readings from yesterday. It was 90 degrees outside, I had the air on full blast, and I was trucking down the interstate at 80mph with a 3″ lift, 33″ tires, and stock gears.
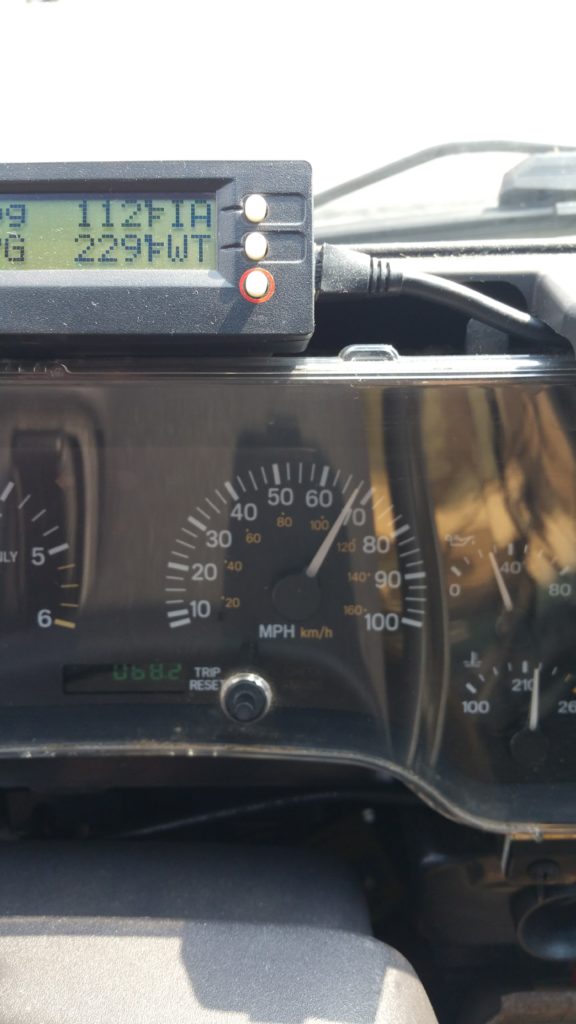
Here’s a lovely comparison of the same PCM signal being displayed as 229F by the ScanGauge, but being interpreted by the temperature gauge as a touch under 220:
And here we have the gauge happily reporting 220, still, yet the PCM reporting 245:
And this is after I’ve been off the interstate for a few minutes with the AC turned off. Scangauge reads 225, temperature gauge reads about 215:
From my experience, the temperature gauge reads fairly accurately up until about the 210 mark. After that is when it starts to lose its’ mind.
The cooling system is not overly complex so there are not a whole lot of things that could be causing higher than normal temperatures. Maybe I’ll do a write-up on what to do next, but this post is really more about pointing out that the temperature gauge is not a precise reading once you go above normal operating temperatures.
(okay, technically the hash marks from 210-260 are 12.5 degrees, meaning the 220 mark is really the 222.5 mark, but even in that case the 245 reading should have been right on top of that hash mark before the 260.)
Recently, I read that Elio was saying that it needed more money to make some prototypes, do testing, and actually start producing their nifty little car.
For those of you that haven’t heard of Elio, they’re a company that was created in 2009 to produce a reverse trike car with a 55hp engine that should be able to reach a top speed of “over 100mph,” and a fuel efficiency of 84mpg highway (according to their site). Currently, the base price is $7450. They started taking pre-orders in 2013, with projected production in 2014… and then 2015… or was that 2016? Maybe 2017… nope, 2018, and this time we mean it!
Oh, and the Louisiana parish that has helped secure them an old GM plant to produce these things is now starting to ask some very pointed questions. Apparently, this company has been holding onto this plant for 3 years, and, after promising to add 1500 jobs to the area, there are currently 28 on the payroll.
I might have written this off as another start-up company that simply bit off more than it could chew, except it’s remarkably similar to another company in the 1970’s. That company was the 20th Century Motor Company and the Dale.
If you’re not familiar with the Dale, Jalopnik has done a wonderful job of chronicling it here, as has Car & Driver here. The quick description is that 20th Century Motor Company was setup to produce the Dale, which was supposed to be a reverse trike car that had a 40hp engine. It would reach 85mph, see 70mpg, and cost $2k (a bit over $9k in today’s money). The media at the time lapped it up, and even the Price is Right had it as a possible prize.
Of course, the entire thing was a scam. The vehicle that was pushed onto the display floor on the Price is Right wasn’t a functioning vehicle, and it was discovered that the prototype that they used in many of their promos didn’t have a steering wheel, or a gas peddle, and the engine was actually from a lawn mower and wasn’t hooked up to the transmission.
The owner of the company fled with the money she had stolen from the company, and was eventually caught years later. Oh, I think I forgot to mention that she was actually using a false name at the time, and was wanted on several money laundry charges. It really is a fascinating story.
So… let’s check off similarities between the Elio and the Dale:
Both are three wheel cars in a trike configuration
Both claim to be able to squeeze great performance out of small engines (“>100mph”/85mpg/55hp vs 85mph/70mpg/40hp)
They’re not far from the same price, adjusted for inflation (starting at $7450 vs $9k)
Both started business during a gas crisis. The Dale had the 70’s gas crises, and Elio was started when $4/gallon prices were not unusual.
Both set production deadlines that they weren’t able to meet. The Dale saw many “delays,” and Elio has consistently pushed their production time back since 2014.
Both have taken in millions in both investment money and pre-orders with no working vehicles produced. Yes, there are YouTube vids of people driving Elios, but you’ll notice that they all state that that prototype doesn’t have the engine that will be in the production vehicle.
Both are claiming to use parts from vehicles from other manufactures, but aren’t actually connected to those manufacturers (as far as I know).
I’m not saying that the Elio is absolutely a scam, and they will never produce anything, but that’s the way I’m leaning until they actually come out with something.
As of right now, I have seven different models for sale in my Shapeways store.
So here’s the story:
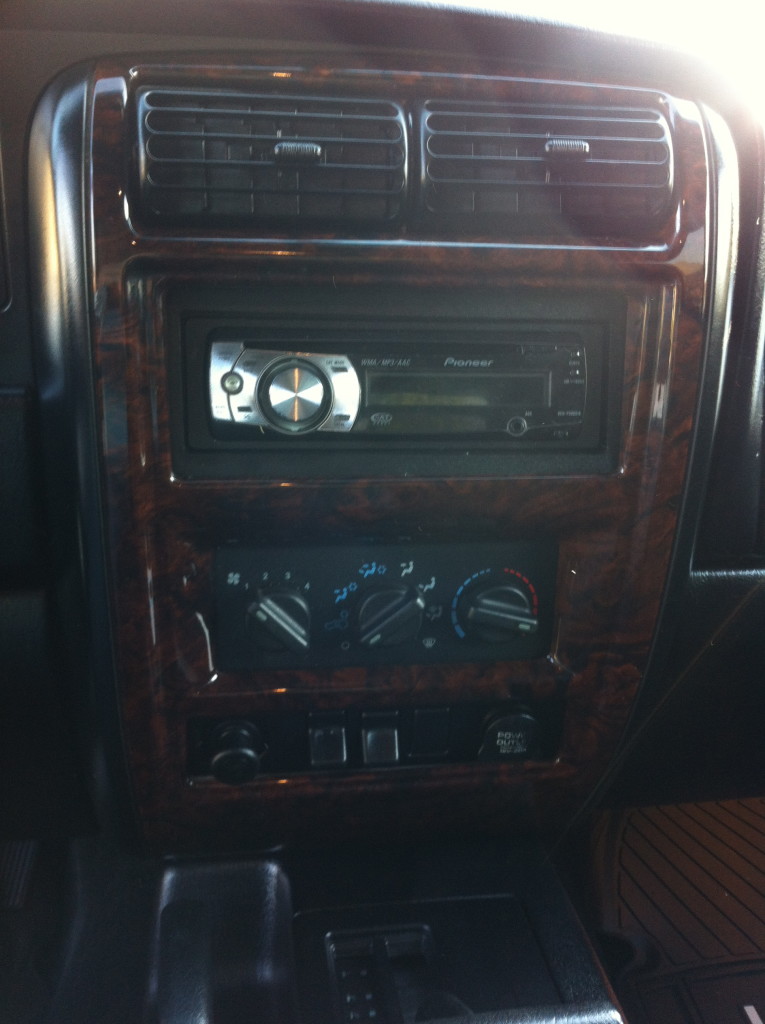
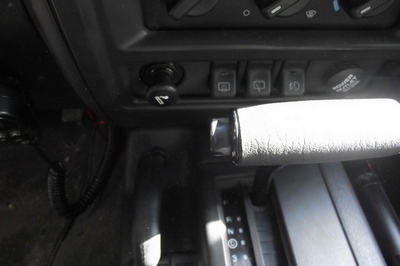
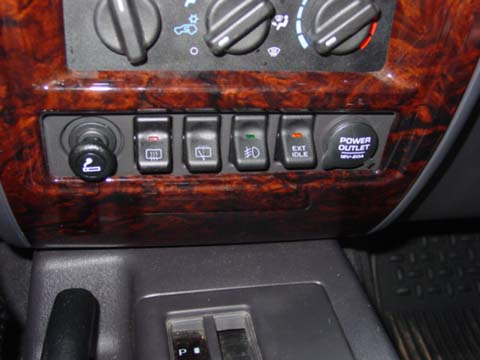
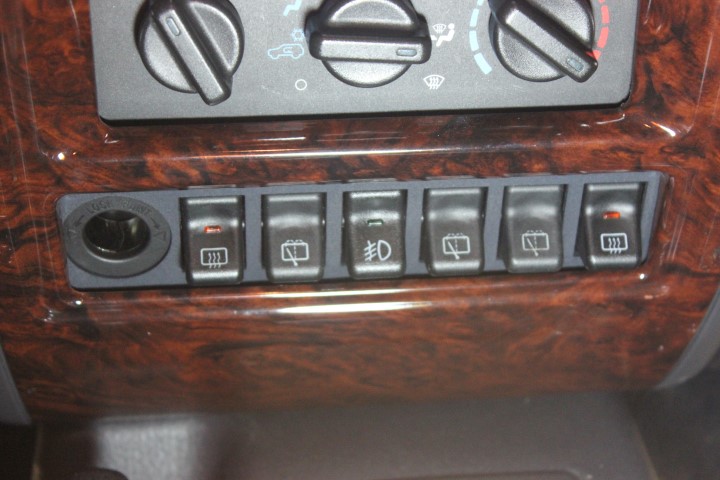
Jeep sold the XJ with one of three different lower switch panels, depending on trim level and options. They all have two 12v power ports–a driver side one that is only on when the key is in ACC/RUN, and a passenger side one that is always on.
They came in three flavors. One with two switches and a blank that is actually solid and completely unable to be converted to hold a third OEM switch:
One with three switches for models with factory fog lights:
And a super-rare 4 switch model that came ONLY in police package models domestically, and in some European export models that also had rear fogs (which is apparently a thing in Europe):
So here’s the thing, though: You CANNOT buy the 4 switch panel anymore. Jeep doesn’t make or carry them, and the parts distributors ran out years ago. They occasionally pop up on ebay for $225 or so, with no switches.
And here’s mine, with SIX switches:
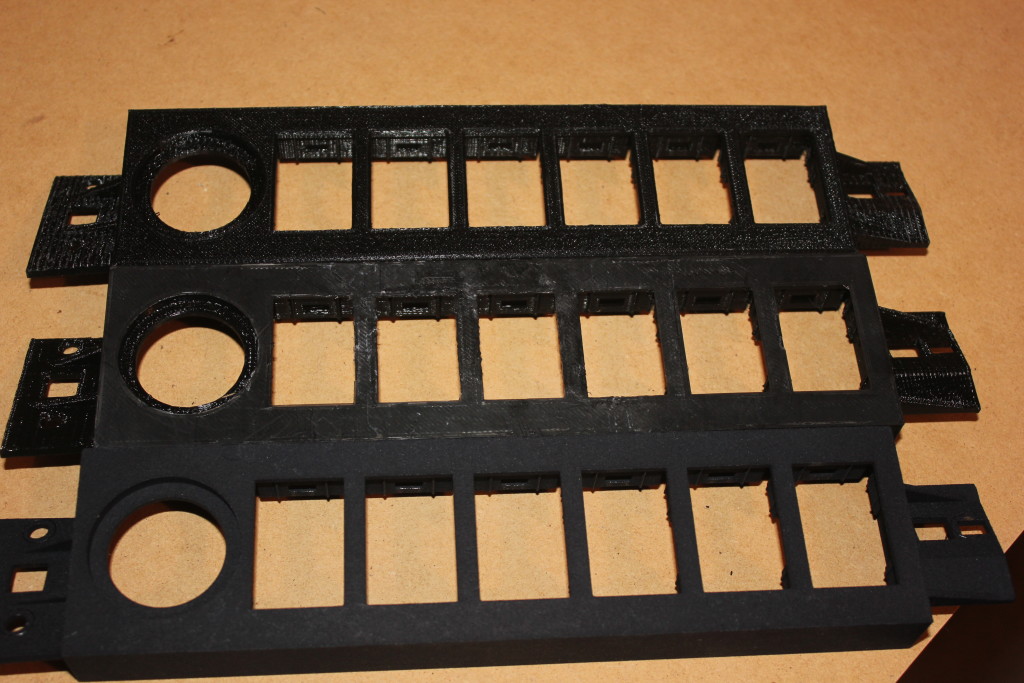
It took about 6 months of designing, prototyping, breaking, and redesigning the panels on hobbyist-grade 3D printers (using makexyz.com as my prototype provider) before I got one that I was ready to try out on Shapeways.
The makexyz printers–depending on who gets your design–can range from $800 to about $2500. The prints are functional, but the quality is…variable. I sent the exact same design to three different printers and got three very different results, structurally speaking.
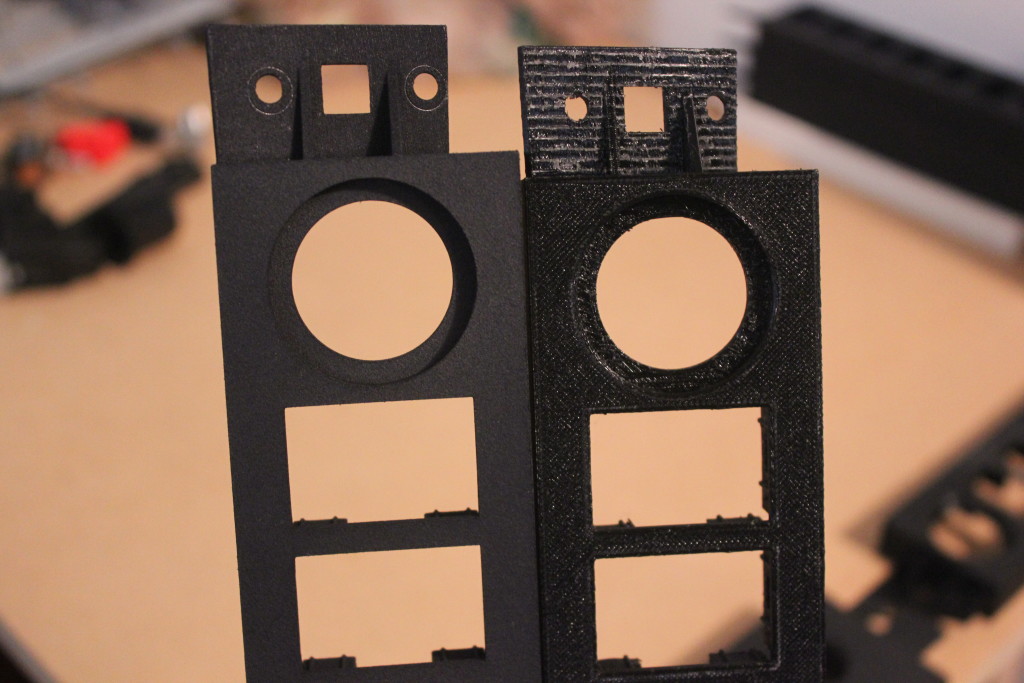
Shapeways uses Stratasys printers, which start at $200,000 each, and produce much more finished products. The two on top here were makexyz prints, the bottom is the Shapeways print. Click to embiggenate.
Left: Shapeways, Right: makexyz
Now I feel like I’ve got the design down I can make custom ones, too. I did 5 models in two hours one Sunday.
So now I have a product, available for sale, that is manufactured on-demand and shipped to your house with no interaction from me. I love living in the future!
Activate Google Now on my Note 4 by saying, “Okay, Google”
Send Google Now the command “Start the Jeep”
AutoVoice intercepts the command and kicks off a Tasker task
Tasker launches Chrome with the URL that corresponds to a PHP page on the Pi
That PHP page calls the WiringPi library and sets a GPIO pin to out mode, then activates that pin for 2 seconds and deactivates it
The relay card accepts the GPIO signal and energizes one of the relays for that 2 second interval
The relay is connected to the Remote Start Activation wire on the Normally Open side of the relay and the Jeep’s Ground on the common terminal, so when the relay is energized, the Remote Start Activation wire is grounded
The alarm recognizes that the Remote Start Activation wire is grounded, and kicks off the black-box-to-me remote start process.
Unfortunately, I don’t have it working with my Samsung Gear Live Android Wear watch yet, but I’m confident I’ll get that figured out.
It’s important to note here that I wrote exactly 6 lines of code here, and two of those lines were the PHP opening and closing tags. This is not a project that requires a lot of that kind of expertise. Familiarity, yes, but not expertise.
The Remote Start
When I bought my Jeep, the previous owner had installed an Avital 3100L car alarm. I’ve had a few cars with remote start, so when the alarm started flaking out on me, I replaced it with an Avital 5103L Remote Start Car Alarm. The reason why I went with that remote start is, frankly, because it shares a harness with the 3100L. I didn’t want to have to re-wire the door locks, starter kill, dome light, etc. if I didn’t have to. Plus it was only like $80. Now that I’ve had it for a while, I know I should have spent the extra $30 and gotten the two-way pager model.
Avital is a DEI brand–like Viper, Clifford, and Python. DEI sells an internet-connected alarm add-on module for like $170 plus $70 a year. As of mid-August 2015, their “new version 4.0–coming early 2015” is still not ready yet. My point is that my Avital alarm has a wire that, when grounded, activates the remote start capabilities of the unit.
This is good, because now we can use this dedicated, purpose built hardware to accomplish the most difficult part of all this: Actually starting the Jeep!
Now, my Jeep is a 98. It’s old. It doesn’t have factory security or any fancy RFID keyfob. DEI has modules that can bypass those things, but they cost extra. Installing a remote start is not for the faint of heart, especially in a newer vehicle with 37 different kinds of security. Remote Starts essentially hotwire the car, and automakers have spent the last decade or so trying to make it very, very difficult to do that.
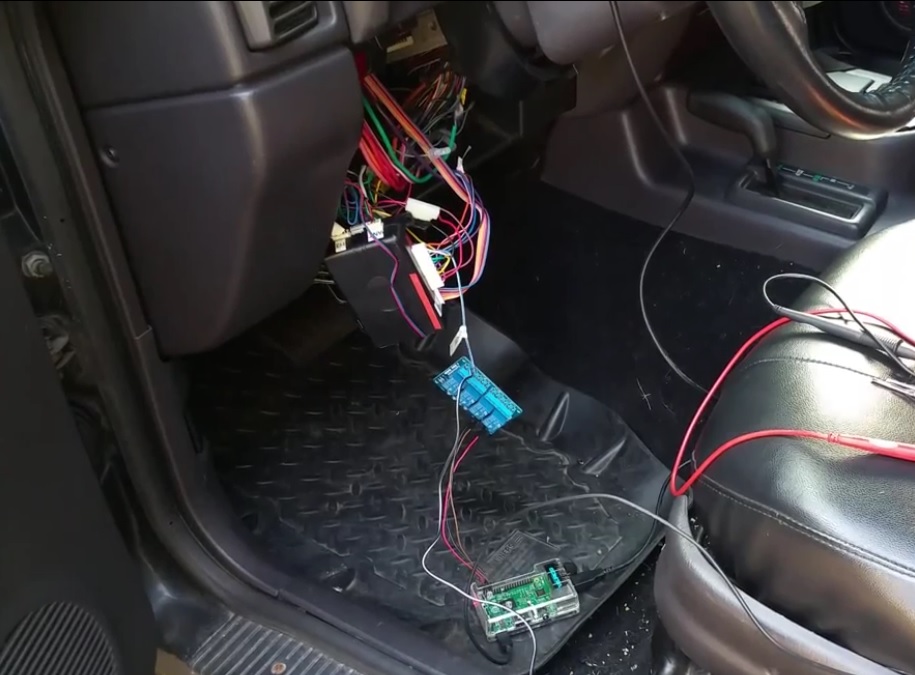
The Raspberry Pi 2
I finally broke down and bought one after Barron plugged it on GBVC EP27. And yes, it was my plan all along to use it for this purpose since I knew about that remote start activation wire.
In addition to my home wifi network, my employer provides a guest wifi network that I can have the Pi connect to. I haven’t gotten this part fully worked out yet, but the plan is to have the Pi connect to my OpenVPN instance at home and route the commands through that. I don’t want other people on the guest network to be able to randomly start my Jeep during the day 🙂
In order to make sure the Pi can actually reach the guest network, I bought a TP-LINK TL-WN722N Wireless N150 High Gain USB Adapter specifically because it has an external antenna connector. I also bought a 5db Antenna, but I’m not sure that’s actually getting me anything. Fifteen years ago I had a little magnet-mount 2.4ghz antenna specifically designed for WarDriving with an Orinoco card and I hope to find something like that. It was a great little antenna.
The Relay Card
The GPIO pins on the Pi can only handle a very tiny amount of current. It may be possible to set up the Pi in such a way that the relay card is necessary, but the card was only a few dollars and I can use the other relays for other things, like rolling down my windows or turning on my rear defrost.
In order to avoid the possibility of frying either the Pi or the Alarm brain, I got the relay card to isolate the two.
The card can be powered by the 5v line on the Pi 2. I’m not sure if I’d want to power all 4 relays simultaneously for an extended period of time, but for my purposes this is fine. One thing to note is that my card activates a relay if it is receiving a 0 on the GPIO line, not a 1. I had to compensate for that.
The Pi Software
I’m not going to lie: I totally followed this fabulous Instructable to get me to a point where I could hit a single page and activate a relay for 2 seconds. I didn’t do steps 5 or 6 because it wasn’t necessary for me.
Here is the entirety of the code that I wrote for this project:
<?php

system ( "gpio -g mode 4 out && gpio -g write 4 1");

system ( "gpio -g write 4 0");

sleep ( 1 );

system ( "gpio -g write 4 1");

?>
That’s saved as RemoteStart.PHP. Hit http://your.pi.ip/RemoteStart.PHP and BOOM! Relay fires for 2 seconds:
Hard, eh?
The Android Software
I bought Tasker about a year ago because everyone says it’s awesome and I had $10 of Play credit to use. As part of this project, I also installed the AutoVoice plugin for Tasker, and then bought the unlock code because it was $1.34 and in order to use the 7 day trial version, the developer wanted me to sign up with an account on some gaming site. Eff that. Take my money.
Now, I thought that AutoVoice was to make this work with my Android Wear, but I was wrong. This is to make this work with regular Google Now.
The AutoVoice page on Play has a pretty good video tutorial so I’ll refer you to that for how to set up the AutoVoice portion.
For Tasker, you want to set up a Task and call it “Start the Jeep” or whatever. Add a “Net” action for “Browse URL” and put your URL in there. Hit the play button to test it: Your default browser should open and go to that page. If not, something’s not right.
On the Profiles tab, create a new Event Profile. Select Plugin->AutoVoice->Recognized. Do the Speak Filter thing they demonstrate in the video tutorial and say “Start the Jeep.”
The Enter Task dialog will pop up. Select the task you created.
NOW THIS IS VERY IMPORTANT! You have to actually activate Tasker! I didn’t at first and was angry–AutoVoice was showing a popup (sprite) saying that it recognized my “Start the Jeep” command, but then it wasn’t doing anything! If you don’t have a lightning bolt icon in your system bar up top, Tasker is not active.
Test it out!
Putting it all together
So now that all the pieces and parts are working, we put it all together in Proof-of-Concept form:
And everything should work…as long as you’re connected to your network.
A few months ago I posted my writeup on the Front Bumper. If you want to know why I picked up this bumper, go read the first section of that post. I’ll follow roughly the same format here.
Please note that there are literally hundreds of hi-res photos on this post. It will take a while to fully load (more…)
I kind of accidentally bought this bumper so bear with me while I tell the story. Regular readers will know that I recently bought a 1998 Jeep Cherokee after chasing a guy down in traffic to buy it. It’s got a little bit of a lift and some 31″ tires. This one came from the factory with a donut spare, which is something I’d never even heard of before in a Cherokee. Because of that, it didn’t have the necessary hardware to properly hold a full-size spare–which only matters a little because the maximum tire size for the factory hardware is…31″.
This is my third XJ. For both of my previous Jeeps, I wanted new bumpers but didn’t really find it necessary to spend the money. I really like the way tire carrier rear bumpers look, this one needed one, so there’s all the excuse I needed. I bought this XJ for less than I sold my WRX for, so that’s where my budget came from.
Looking around, most of the bumpers that did what I wanted were in the $1200 range. That was basically my whole budget for upgrades so I kept looking. Smittybilt came out with one that got mixed reviews mostly from people who’d never seen one. “Trail Ready” and “Smittybilt” aren’t usually used in the same sentence. There were lots of questions about the thickness of the steel, the quality of the welds, and whether they tied into the frame or just used the stock bumper mounts. There weren’t any good writeups out there because the manufacturer has had problems with lead times. I think it was 6 months to a year before the first paying customers actually got their bumpers in hand.
If I’m completely honest with myself, the bumper would be just for show. I went wheeling exactly one time with the previous two Cherokees…and rode with someone else. The Smittybilt bumper was $750 pretty much everywhere, so I could save $450 if I bought theirs.
I live about 3 miles from a retail store for 4 Wheel Parts. They’re a retailer for Smittybilt, so one Saturday I took liwizard and we went investigating. They didn’t have any of the Cherokee bumpers on display, but they did have others in the XRC line for me to look at. They had something else, too.
There was a single sales flyer about the size of a postcard sitting on top of one of the Wrangler bumpers: “Buy a Cherokee front and rear XRC bumper by June 30th, get XRC Rock Sliders for free.” The sliders are about $500.
So for the cost of a “standard” tire carrier bumper, I could get the front and rear bumpers plus rock sliders. Yeah, so that was kind of a no-brainer.
Unfortunately–and this was not explained to me properly when I made my purchase–everything except the front bumper was backordered. For four months. Apparently “They’re in the warehouse in California and will take 3 weeks to get here” doesn’t actually mean that the ones in the warehouse haven’t already been bought by someone else. I learned that when I picked up the front bumper and the counter guy casually mentioned my other stuff was on backorder.
Things you should probably know up front
The box is much larger than you’d think. When I went to pick it up the first time we discovered it won’t actually fit in the back of a Cherokee. So unless you’re getting it freighted to your house, you’re going to need a bigger boat. The actual dimensions of the box are 71 1/2″ x 23″ x 13″ and it’s listed weight is 185 lbs.
The instructions are, well, lacking. I didn’t have any luck finding them posted anywhere, so I scanned them and uploaded them here in hopes that some other poor soul can find them: XJ XRC Front Bumper SB76810 Install Instructions
I apologize for the quality of the photos in the instructions…but that’s what ships with the bumper. No color photos, and the black and white ones are pretty grainy.
There more bolts and washers included than you’ll need, but there aren’t more nuts than you’ll need. I suspect this is the standard hardware they send out with several models.
There are two different sized washers. For the standard head bolts, use the smaller ones.
The 2″ spacer they mention is actually a 2″ washer
On 1996 and older models, cutting is required on the front fenders. I’ve seen some folks complain that the instructions tell you to cut too much, so there’s that.
Also, since you’re going to be in there anyway, you might want to pick up a steering box brace. I’ve heard good things about the M.O.R.E. brace. It didn’t occur to me until I was already in there that this would have been a perfect time to do it. Oh well.
I went almost a month between my last two posts. Hopefully that won’t happen again (although I’m two sentences in to this and have already had to stop a half dozen times to deal with either the tactical dog or lilwizard, or both).
Mostly I’ve been chasing down a problem at work that had a June 1st deadline for resolution or it’ll cost us several million dollars. I love you guys, but you don’t buy my groceries.
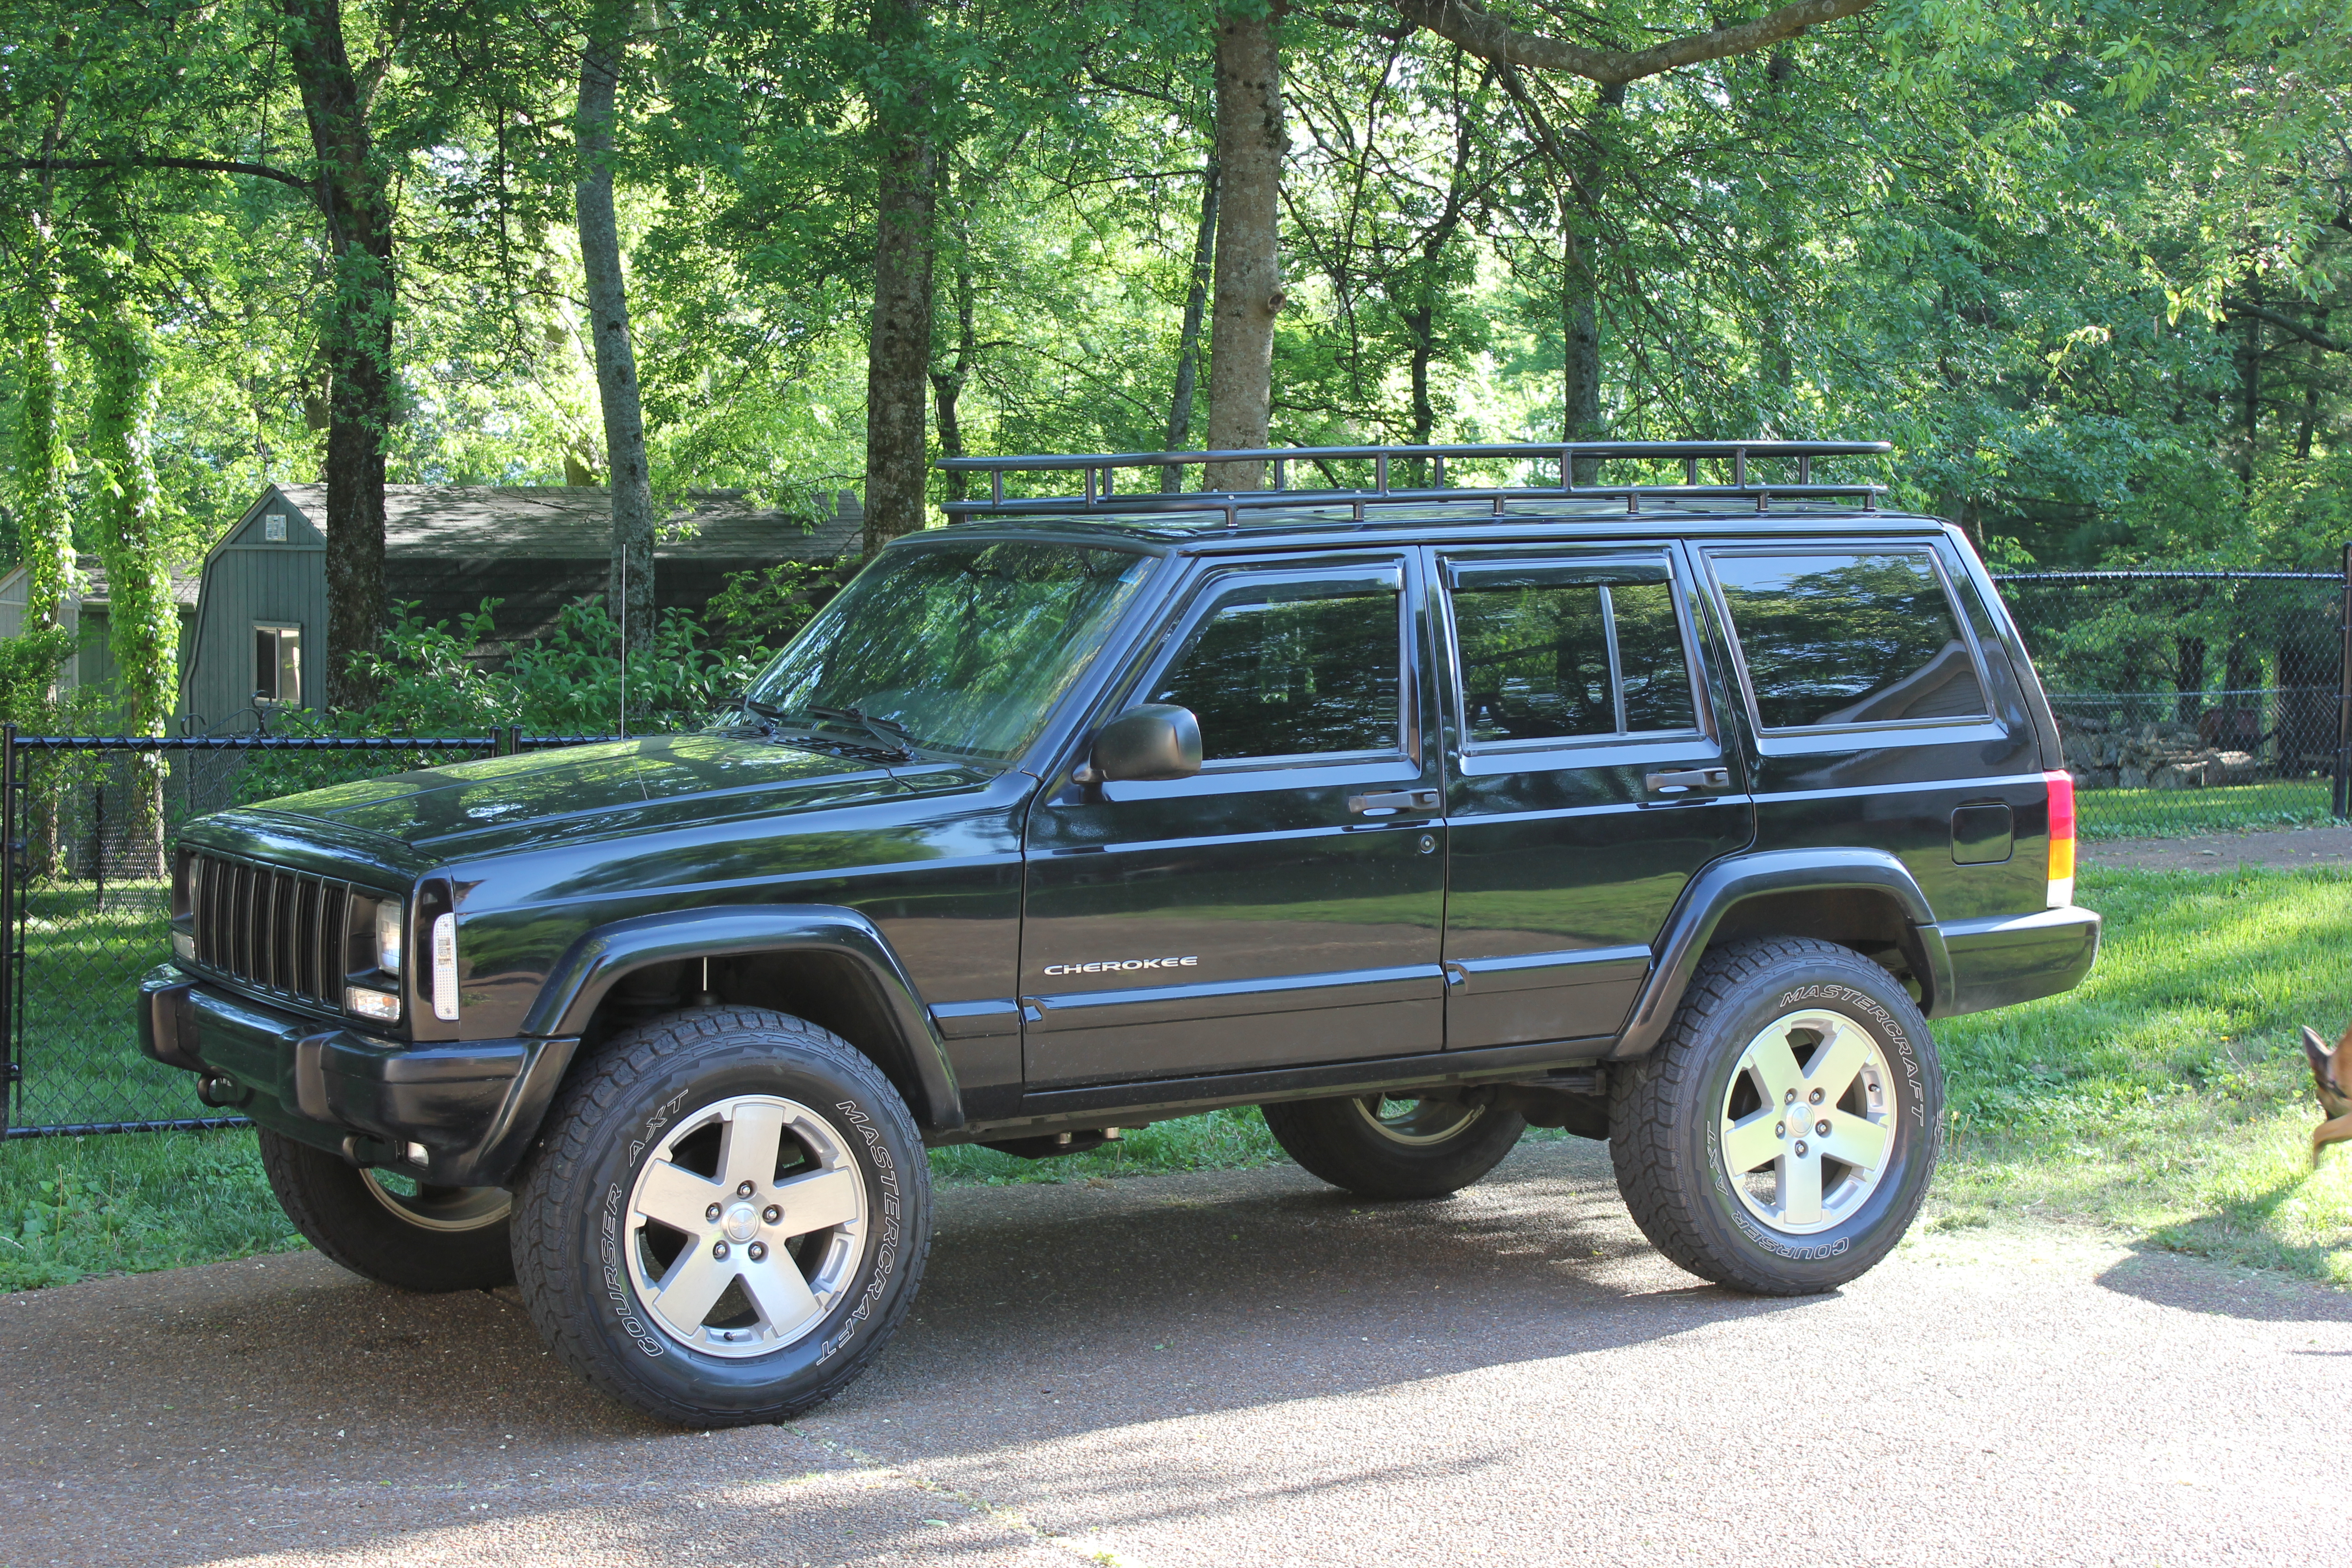
For those of you keeping score at home, that’s my third Cherokee, not counting the three my dad had when I was growing up. I pretty much started looking for one again about the time the guy who bought my last one rounded to corner out of sight. At the time, I needed the extra money more than I needed a third vehicle, especially since my daily driver was a 4×4 Excursion.
I’d been hardcore looking for one for about 8 months. I really wanted one withe the NP242 (Selec-Trac) transfer case, but about six months in to my search I had seen exactly one for sale within a hundred miles of here, and it sold before I could get to the guy and buy it. It was a 92 XJ Wagoneer, for those who know what that is. So I resigned myself to buying one with the NP231 and doing a swap.
Well I finally got tired of being treated like a 17 year old while driving the WRX so I put it up on craigslist. Basically, within 90 seconds I had two soccer moms SCREAMING at me for going too fast–first in a parking lot where I was backing out of a parking spot and then again while sitting at a stoplight not moving at all. So I started remembering all the times where the crossing guard on my way to work would wave for me to slow down when I was 30 ft from the guy in front of me and all the times I’d been pushed into oncoming traffic by merging minivans who either didn’t see me or didn’t care.
It sold in about a week.
On Sunday a couple came and looked at it. Sunday night they let me know they’d be coming by Monday evening to pay me and pick it up. Monday morning on my way to work I said to myself, “Self, if you see that Cherokee you’ve been admiring for the last year today, and you can turn around and follow the guy to his office, you should see if he’ll sell it to you.”
So that happened.
The previous owner had done just about everything I would have wanted to do to any XJ that I picked up, and hadn’t done any mods that I would not have done. The only thing wrong with it was a bad driver window regulator and some flaky wiring (ON A JEEP? YOU’RE KIDDING!) in the rear hatch, both of which I fixed on the first weekend. It does have the 231 so I want to do a swap but I need to wait until I get another vehicle to do that. See, doing that with 3″ of lift may cost a mere $200 for just the transfer case, or it may cost upwards of $2000 for the case, axle shims, and a new driveshaft with a slip yoke eliminator. You don’t know which it’ll be until you replace the transfer case and then get it on the interstate. If there are vibrations, you have to send off the output shaft to get it machined. So that’s going to wait a little bit.
Also, I’ve had it for a couple of weeks now and even though I really liked the way the rims and tires looked on it, I may replace them with Cragar Soft D‘s and some BridgeStone Dueller’s. We’ll see.
Ever since I sold my last one, I’ve regretted it. I’ve owned two cherokees (a 93 police package and a 99) and loved them both dearly. They both developed electrical problems and due to time, money, and storage limits they had to go.
For about 6 months I’ve been looking for another one. Jeep stopped making the Cherokee in 2001, so what’s out there generally has about 180,000 to 230,000 miles. I’ve been looking for another 99 due get the best mix of parts interchangeability and reliability, and about three weeks ago decided that if I really wanted an NP242 transfer case, I was just going to have to buy one with the NP231 and swap a 242 in.
That made it really easy to find one in the price range I was looking at: