I am going to try to start a new series about some of the tips and tricks I’ve picked up. Some might call it “fieldcraft” but since I am not a super secret squirrel who operates in operations, I am not nearly cool enough to call it that.
The first few I’m going to do are going to involve a laminator. I specifically bought one to use on some of the things I’ll be talking about. They’re not expensive, but you could probably just use packing tape for most of these things instead of a full-on laminator so just keep that in mind. The reason for lamination is so that you can use map markers and have a reusable but also semi-permanent writing surface.
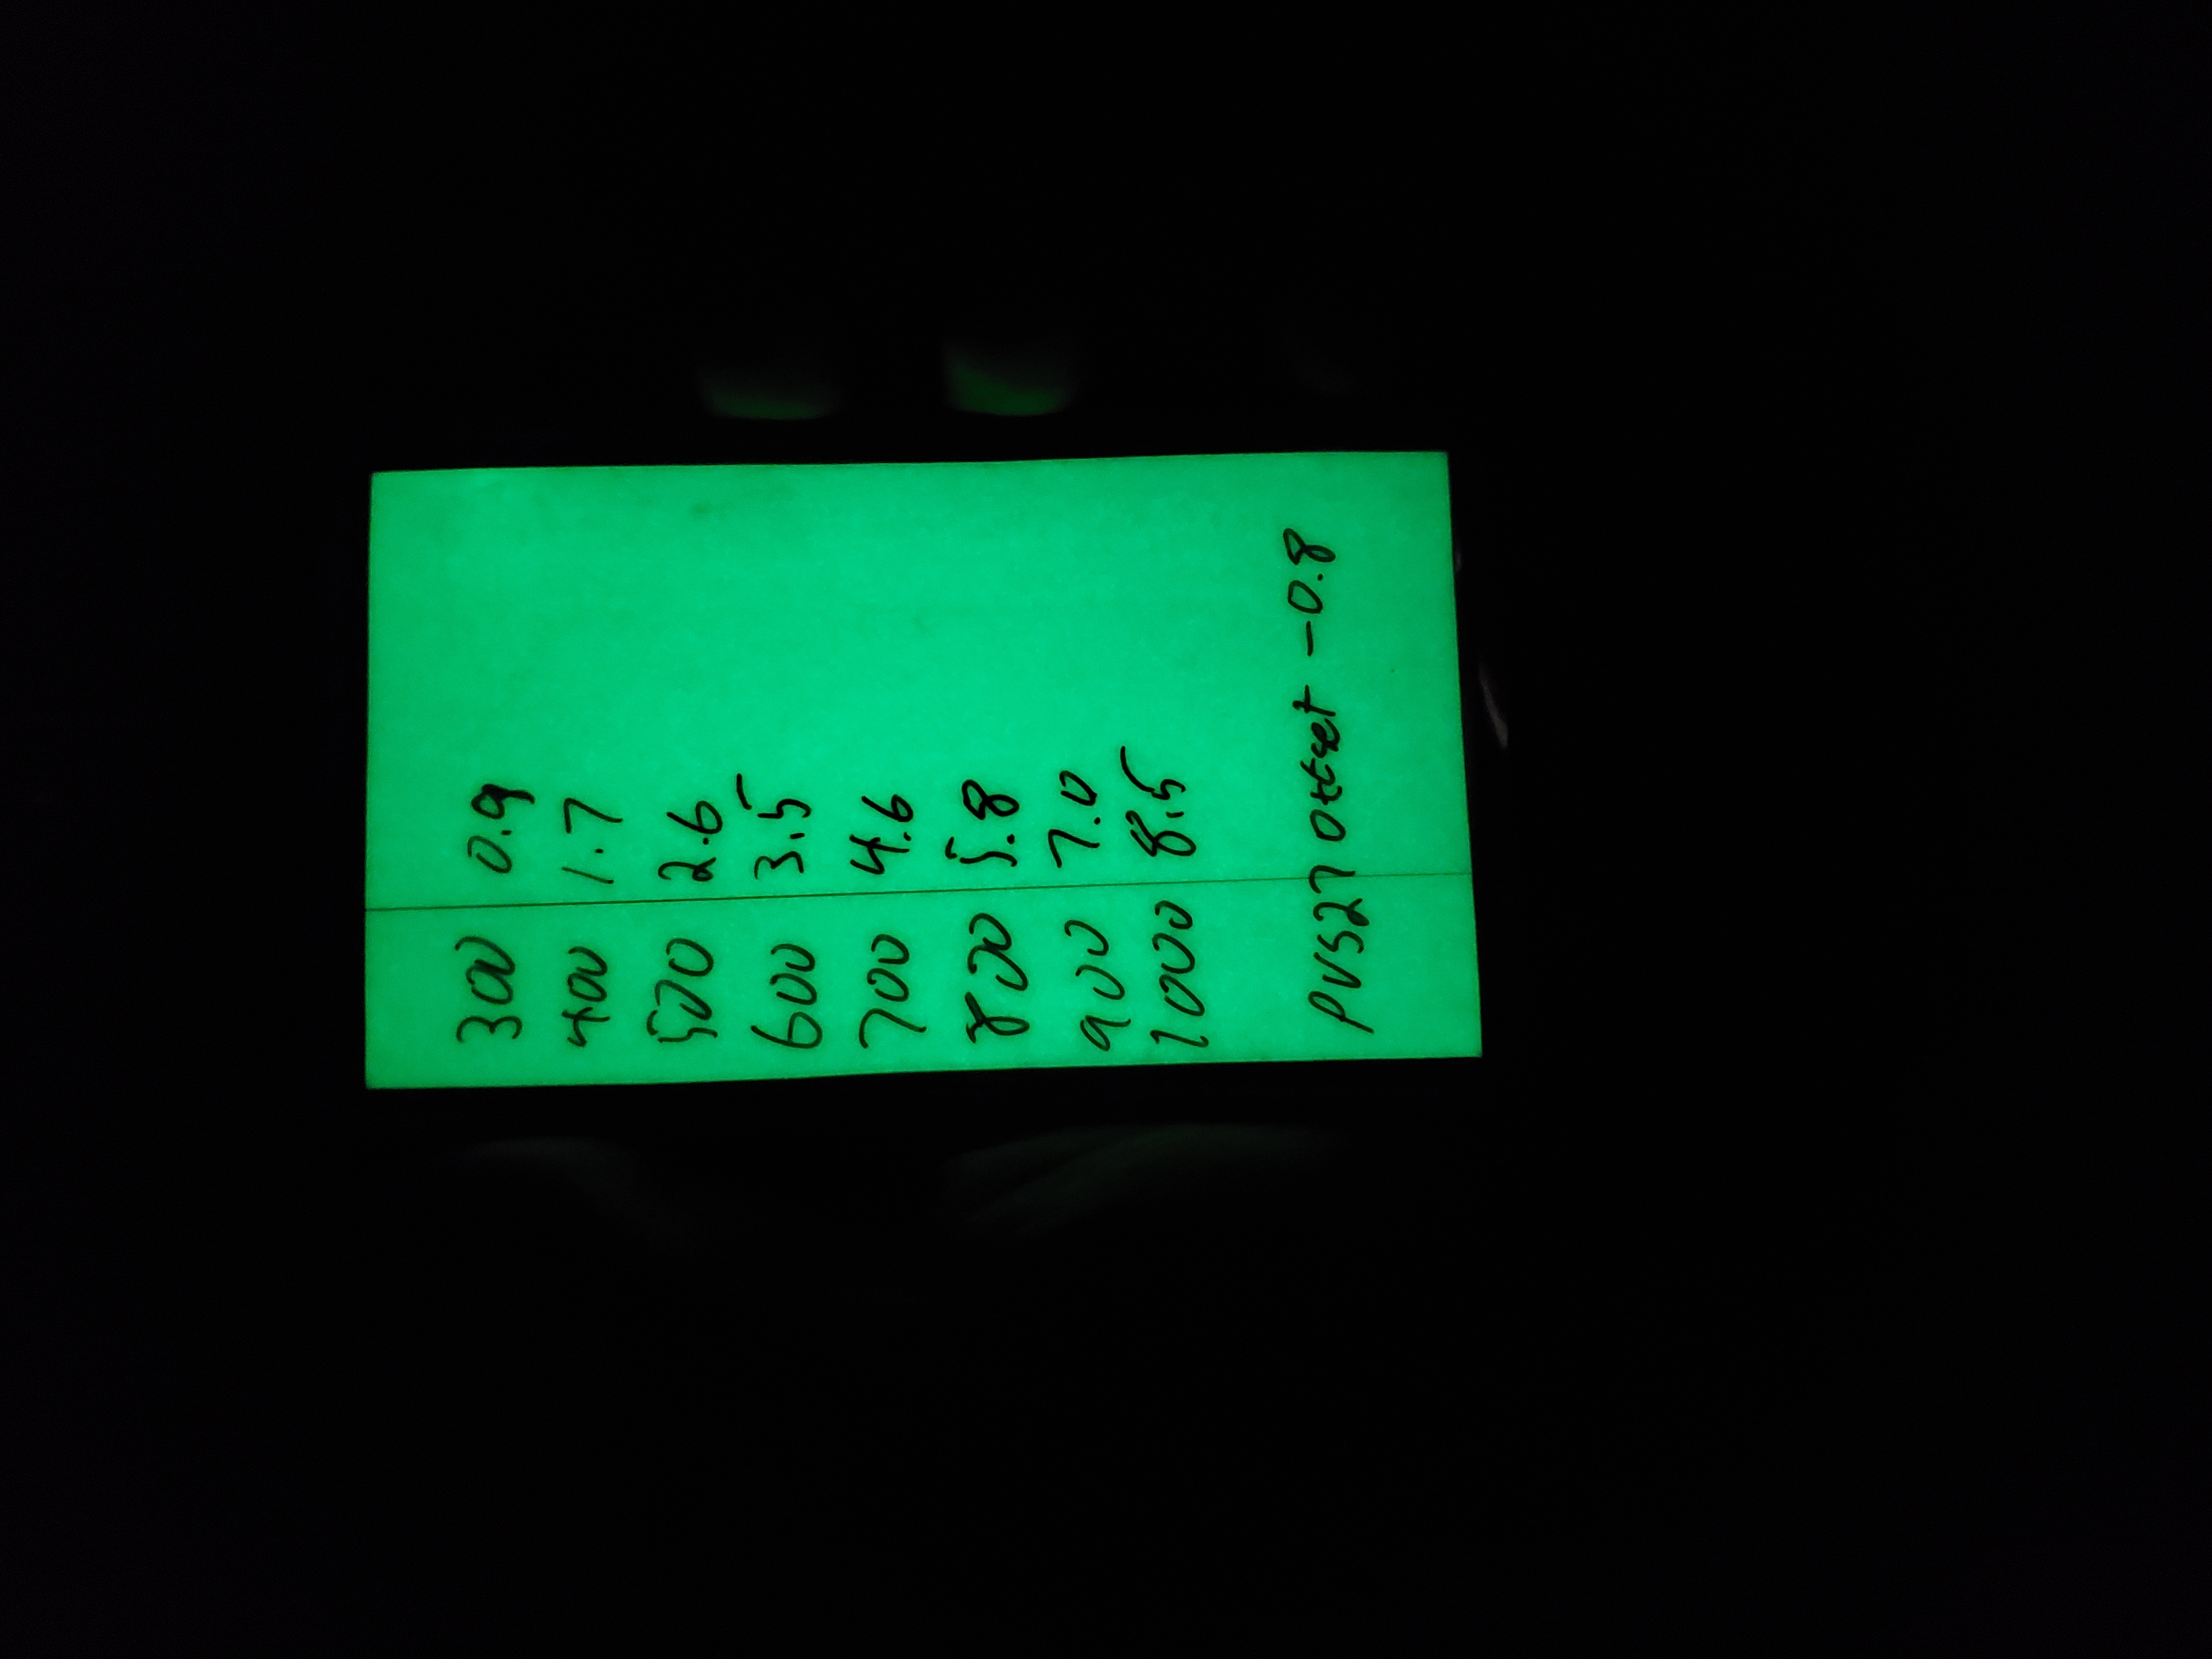
First up is going to be the Glow in the Dark Dope (or DOPE) card.
DOPE stands for Data On Previous Engagements. The term actually goes back to when the only way you could really figure out what your bullet drop was at specific distances was to go out and shoot those distances and write down the data. You’d record distance, wind, temperature, elevation, and other environmental variables so that later, you’d use that data from your previous engagement to get a really good idea of what your bullet was going to do.
Nowadays we have doppler radar derived drag curves and ballistic computers that are so inexpensive and precise that you don’t need to spend the time and money collecting your own dope, you just punch in some numbers and the ballistic solver tells you what your drop is.
Which is great and all, but a lot of shooters (myself included) like the simplicity of a card with numbers written down. I mean I love my Kestrel but it’s way faster to look at a dope card than it is to scroll through targets or adjust your range.
So here is what I did (it’s super simple): I took some card stock and covered it with 2″ glow in the dark tape. An index card would also have worked but I have a ton of card stock left over from a prior project. Then I cut that down so that it would fit in that in the Rite in the Rain notebook cover that I’ve been using as a wallet for the last 2 years. I had a very wet shooting class in October of 2019 and shortly after that I started buying Rite in the Rain notebooks like Hunter Biden buys crack pipes. Then I laminated it, obviously. So now what I can do is I can use my Kestrel to get my dope for the ranges I’m going to be engaging and write it down on my little dope card. Because the map markers take either an alcohol pen or an alcohol swap to erase, I don’t have to worry about rubbing off the data accidentally. Then I can “charge” the glow in the dark tape by either just leaving it out all day or shining a light on it before I really need it.
This is what the card looks like after holding it up to a light bulb for about 20 seconds:
It’s advertised as working for 6 hours but I haven’t actually tested that. I does last a while, though.
There are tons of other glow in the dark paper products out there, too, so I may experiment with some other things in the future.
Story: He died with COVID. He also had lung cancer, and was recently hospitalized for a week with pneumonia. Maybe COVID did actually kill him, but I’m unconvinced after a local mayor “died of COVID” and stage 4 brain cancer but you had to, like, already know the dude had brain cancer because none of the death stories would mention it.
Reality: Cooper raised property taxes by 34% during a pandemic with record unemployment without ever even considering cutting back spending. Now that the covid numbers are down and he’s expecting a return to 2019 sales tax revenues, he puts forth the largest spending plan in Nashville’s history,
Police in Tennessee are investigating after a man was shot and killed Friday night during a robbery ‘prank’ for a YouTube video.
Nashville police responded to the parking lot of an Urban Air indoor trampoline park at 9:25pm where David Starnes Jr., 23, admitted to shooting 20-year-old Timothy Wilks.
Witnesses told detectives that Wilks and a friend were participating in a ‘prank’ robbery.
The stunt was apparently all part of a YouTube video whereby Wilk approached a group of people, including Starnes, with butcher knives.
Starnes said he was unaware of the prank and shot Wilks to defend himself and the people he was with.
According to MNPD, no charges have been filed in Wilks’ death. The investigation is ongoing.
Yeah.
That was a bad idea in a state where roughly 20% of adults have a carry permit. This is should be a story that gets repeated a lot in the future, as a cautionary tale against doing stupid things that can get you killed but I’m not optimistic about that.
That’s all I’m going to say about the dead guy. I’d like to focus on the shooter, because he’s going to need some help.
It’s likely that he realizes two things right now: 1. He reacted exactly as he should have, given the information he had at the time. 2. The guy he shot wasn’t really going to hurt him.
That second one is going to be with him for the rest of his life, though.
In 2008, I had a similar experience with a much happier ending. I won’t go in to too much detail, but a group of teenagers decided to pull a prank on a motorist and that motorist was an armed me. It was at night and I don’t think they ever realized how close they came to tragedy, but luckily I was able to realize it was a hoax before it was too late. And yes, had they actually been doing what they were pretending to do, I would have been 100% justified in opening fire. It’s a very close parallel to what happened here.
I’ve often thought about what would have happened if things had gone differently. Would the group have banded together and say I opened fire “for no reason”? Would the Nashville DA have wanted to make an example of me? I would most certainly have been fired within a week. Would I have had to move across the country to get away from bad press? Would I have ever worked again, even if no charges were filed?
This young man, David Starnes, is going to be going through all of those things I was terrified of.
As I write this, it’s been barely 4 days since an RV exploded in downtown Nashville. I’m 15-ish miles away and was never in any danger. Interestingly, I was walking the dog when it happened and I should have heard it, but didn’t.
There’s still a ton of speculation–some in bad-faith, some in ignorance–about why he did what he did, but I’m not going to talk about that.
My day job revolves around being prepared for disasters, and this can be treated exactly like a disaster due to the nature of the target. In fact, some of my colleagues have spent much of the last 4 days implementing disaster mitigation plans due to the failure of the AT&T network. I am incredibly proud of the work that they have done both in the last four days and the last four years in preparation for an event like this.
So, looking at it from a pure communications disaster/widespread failure standpoint, I wanted to note a few things for you to think about.
Know your local infrastructure When I first saw reports of an explosion downtown, I thought it was a transformer explosion. That has happened a couple of time in the last 30 years so it seemed logical, especially considering the area. Like every other IT nerd in Nashville, I knew exactly what that building was and what it’s purpose is. It needs a lot of power, and it’s been there for a gazillion years.
Once the police said it was “an intentional act” I knew that the AT&T switching station was the target. There was nothing else important in the area (really, who bombs a Hooters?), and a much more politically appealing target–the Federal Courthouse–is only about 10 blocks away. Whoever it was, their purpose was to disrupt communications.
The AT&T network is not as resilient as you’d think, but it is pretty resilient. A lot of people locally are angry with AT&T because of the loss of cell service, 911 service, internet, etc…but AT&T can only do so much to prepare for something like this. It took almost 5 hours from the time of the explosion until the first widespread outage was noticed. My theory–and I cannot stress enough that this is a theory and not based on actual facts–is that the automated systems started re-routing traffic exactly as intended, but that the load was too much for the secondary systems. Essentially, they moved calls from going through Nashville to going through Louisville, but the Louisville system did not have enough capacity to handle the load of the entire Nashville infrastructure going down. That’s why you had outages up that way, too: Network overload and nowhere to go.
Sure, they could have planned for this, but then your $80 cell phone bill would be $200. It’s a calculation that every company has to go through and I’m not going to fault them with less than perfect resilience.
Anyway, the point is that you should know your local failure points. I expected a comms breakdown because I knew the importance of that building. This is important for natural disasters, too. When we had a flood in 2010 and a news helicopter showed footage of the local gasoline depot under water, I knew we were about to have a gas shortage.
At a minimum, you should know the locations of the following facilities:
The power substation that feeds your home and/or office.
The power plant(s) that feed that substation.
The water treatment facility that feeds your home and/or office.
The distribution point that your fuel comes from. Gasoline, heating oil, etc.
The distribution point that your food comes from.
The switching station or local exchange office that handles your phones.
If there was some sort of widespread natural disaster in your area, knowing these things may help you make a decision to leave much easier and much faster. In that 2010 flood, for example, two of Nashville’s three water treatment facilities were taken out. The third came very, VERY close to also being rendered inoperable. If that one had been breached, we would have evacuated within an hour or so.
Communications Redundancy This one can be confusing but I’ll try my best. I’m not talking about the need for everyone in your family to have a HAM license and a pre-programmed handheld and mobile radio (although that is useful as we’ll see later). I’m talking about the poor folks here who had AT&T for Voice, Data, TV, Cell Service…the works.
Those people were completely cut off from the world for 24 hours+.
The day after my wife and I had our very first date, T-Mobile had an outage that affected something like 8 states. I really needed to call this super-cool girl for a follow-up date because she was leaving town the day after, so I ran down to Target and bought a pre-paid cell phone on AT&T’s network. The day was saved, I got the second date, and now we have two kids, a dog, and a house in the suburbs.
When we got married, she kept her Sprint phone for a while and I had switched to AT&T after the outage. This was important, because Sprint and AT&T used completely different network technologies at the time. There were no scenarios outside of a widespread long-term blackout where both of us would be out of cell service. That’s a communications redundancy.
Today, we’re both on AT&T for cell service and we have Comcast for internet. I have Google Voice, so that gives me VoIP for my “cell phone” number and I could still send and receive text messages during the outage. We had some communication ability, but it was limited.
Then, the day after the explosion, Tactical Dog had a medical issue and had to go to the vet, like, now. She’s fine, but the experience exposed a problem.
My phone worked on wifi, but only on wifi. When I left the house I was completely isolated. If we’d still had separate cell phone carriers, I could have just taken the other phone, but we’d consolidated to one carrier to save money.
Everything worked out, I just had to live in 1994 for a few hours. I remember 1994 so I was fine. But it brings me to my final point.
Have printouts for emergencies Right now, can you put your hands on a piece of paper with your local EMS/Fire dispatch’s phone number? Or your doctor’s? Or your veterinarian’s?
One of the effects of the bombing was a widespread, multistate 911 outage. Everyone had to call either the non-emergency dispatch number or the local precinct/fire hall/whatever. There were lists floating around twitter and the Emergency Management websites but you had to know where to look. And you had to have internet, which you may not have had.
I was fortunate enough to have been to the vet’s so many times that I knew how to get there without the aid of GPS (which would have required downloading map data since our vet is outside the area we normally roam around in–which is a story for another day). If the way I knew how to get to the vet’s office had been blocked, as might be likely during a more widespread disaster, I’m not familiar enough with the area to have routed around it quickly without the aid of a map.
A pre-printed map, or a paper map with important locations already marked, could have been a literal lifesaver for about a 36-hour period. I bought a good old-fashioned paper map last January just to keep in the car. Something to think about.
The last thing I wish I’d had beforehand was a list of local repeater frequencies, either pre-programmed or printed out. This is amateur radio specific, but as I sat in the vet’s parking lot waiting on them to treat the dog, I realized that my little handheld was way, way out of range of the repeaters I normally use. Again, the vet is outside our normal operating area, but it’s close enough that I really should have put those frequencies somewhere handy.
So that’s all I have for now. Just a few lessons-learned from someone on the ground with a somewhat unique professional perspective.
UPDATE 3/26/2020: The site I describe below, ADSBExchange, switched to a completely different piece of software about a month after I made this post, so the specific directions are no longer valid. However, the concept is the same and ADSBExchange remains free.
Original Post:
Have you ever wondered what plane that is, but had no idea how to figure out what it was? Here’s a beginner’s guide to viewing ADS-B feeds from ADSBExchange.
First, a couple of definitions. ADS-B is a replacement for air-traffic control radar, and is now fully-deployed in the United States. Instead of depending on Doppler radar coupled with transponders that react to an interrogation signal, ADS-B transmits constantly from the aircraft itself. This allows other aircraft to get real-time information about everyone else flying around them instead of having to rely on air traffic control to tell them about other traffic in the area.
It also means that anyone can pick up the signal. A few years ago, some enterprising hackers discovered that a $25 USB Digital TV Receiver could pick up these ADS-B signals with very little effort. Fast forward, and now you can buy purpose-built receivers for $20 or less, plug them in to a Raspberry Pi, download some free software, and view ADS-B signals from 250 miles away. No monthly subscription required.
This led to a couple of projects that allow people to share their signals with each other to get a broader map of the skies. One of those projects is ADSBExchange, which receives feeds from hundreds of stations across the world and aggregates them into a single site.
Welcome to the world of open-source intelligence. Unlike some commercial services, ADSBExchange is unfiltered and real-time. The FAA has provided feeds in past to commercial services with a 15 minute delay, and owners could opt-out of having their aircraft included. ADSBExchange gets around those limitations.
If you find this service useful, please consider donating and setting up your own feed.
Now on to the good stuff:
These instructions are Desktop-based, but you can also use your phone. The screens look a little different but the steps are the same.
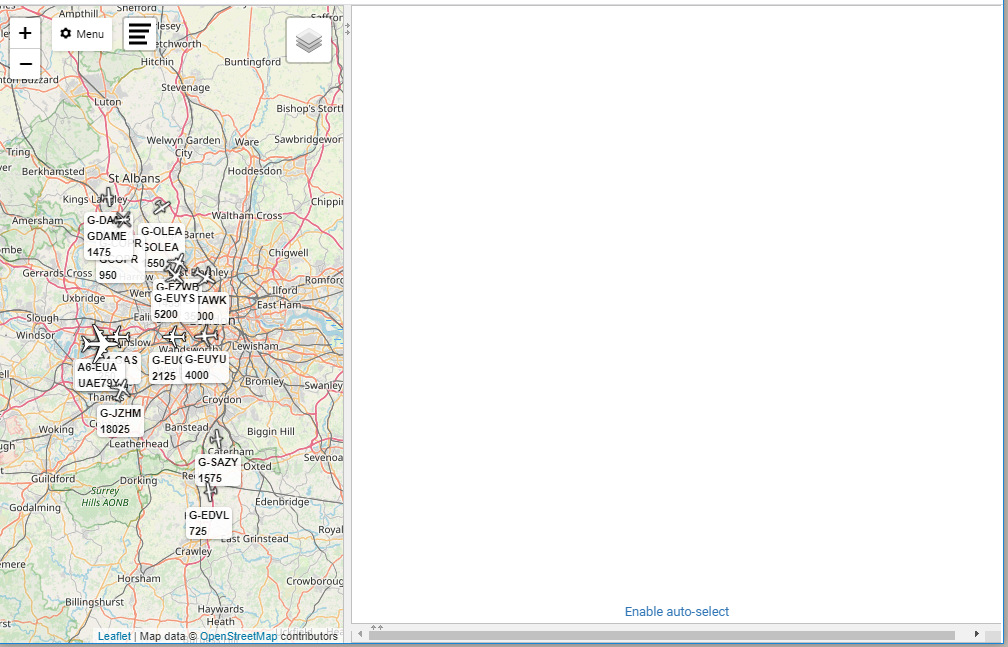
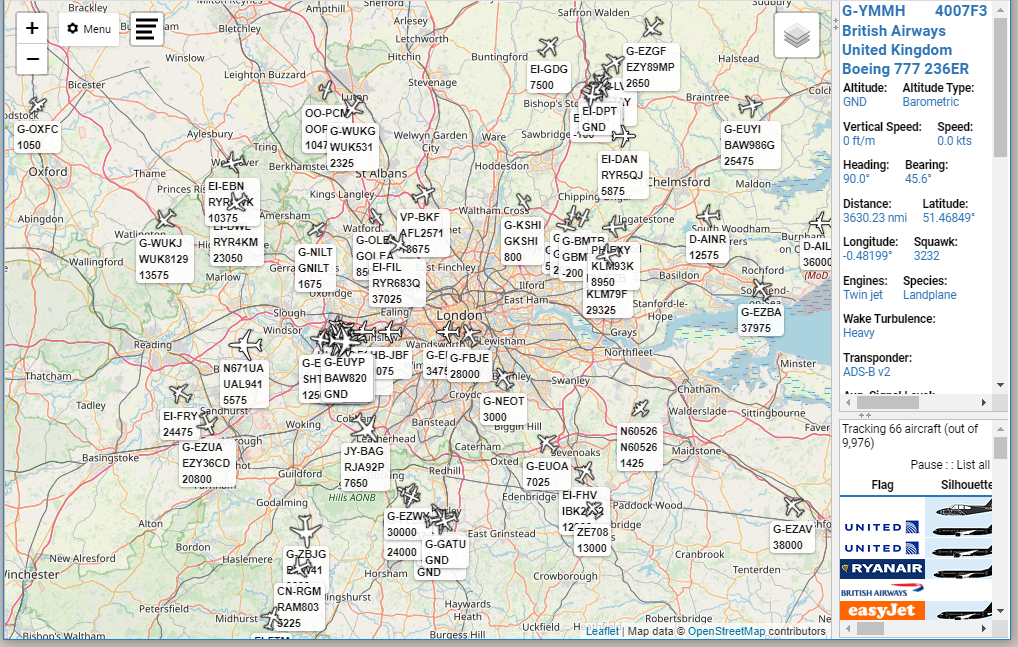
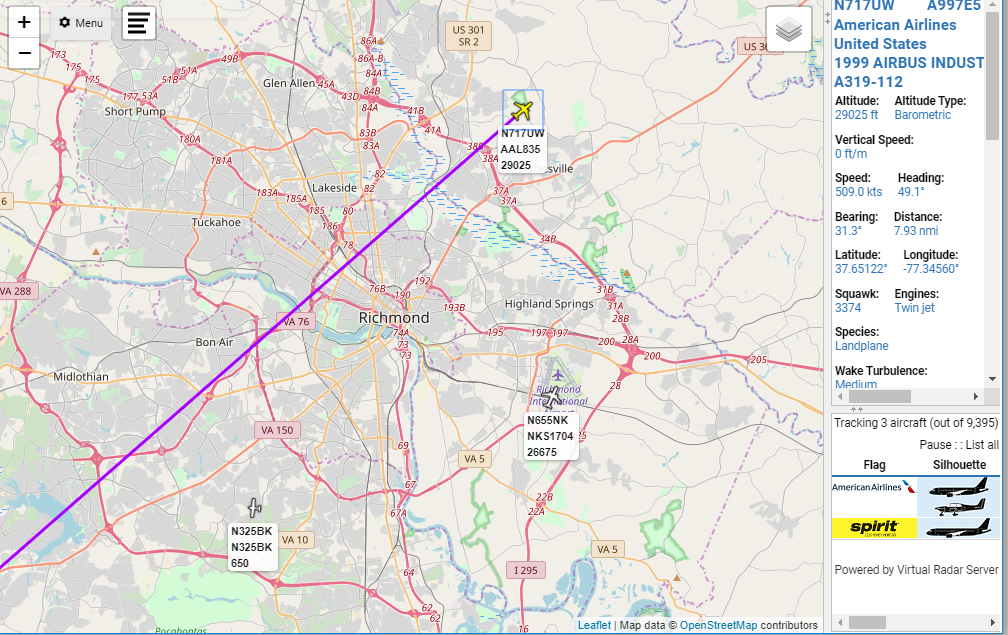
Open up a browser and go to http://adsbexchange.com Under the Global Radar View, hover over “Global Radar” and then click “Desktop” or “Mobile” depending on the device you’re using. This is a Desktop-based tutorial, so keep that in mind. I’m also intentionally using a very, very small browser window so I can keep the screenshots readable.
You will be presented with the default settings applied. Virtual Radar Server defaults to London as the center of the map with no filters, no aircraft trails, etc. Here’s what it looks like on a small-ish browser window:
On the left you have the map, on the right you have an aircraft info window which is blank because no aircraft is selected, and below that is a list of current aircraft sorted by model name. You can’t see the list in that screenshot because the Aircraft Info window takes up the entire screen area, but you can see control to “drag up” and see the list while making the aircraft info window smaller.
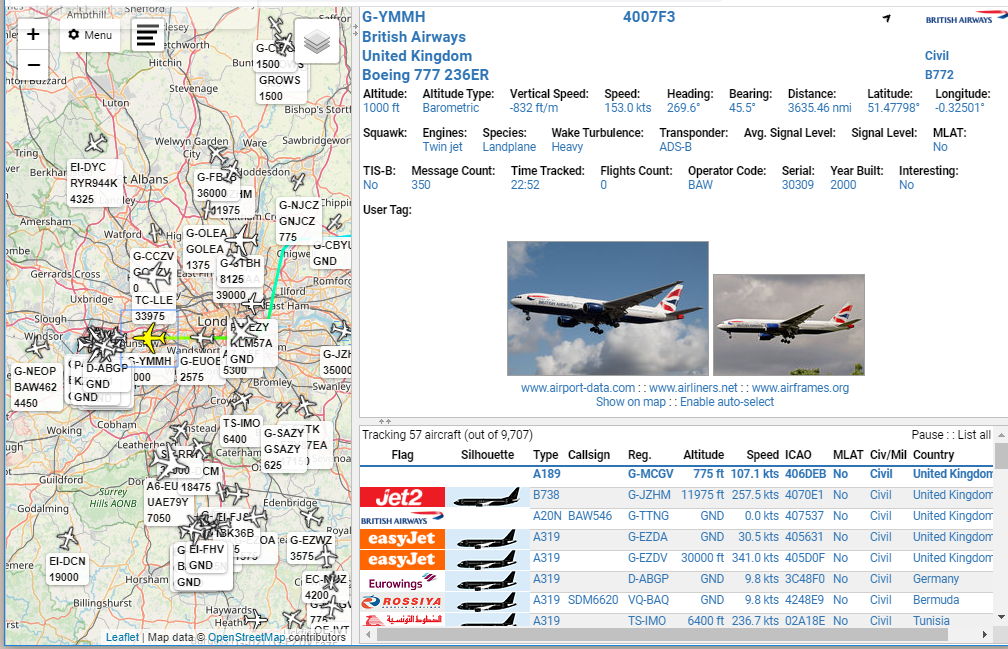
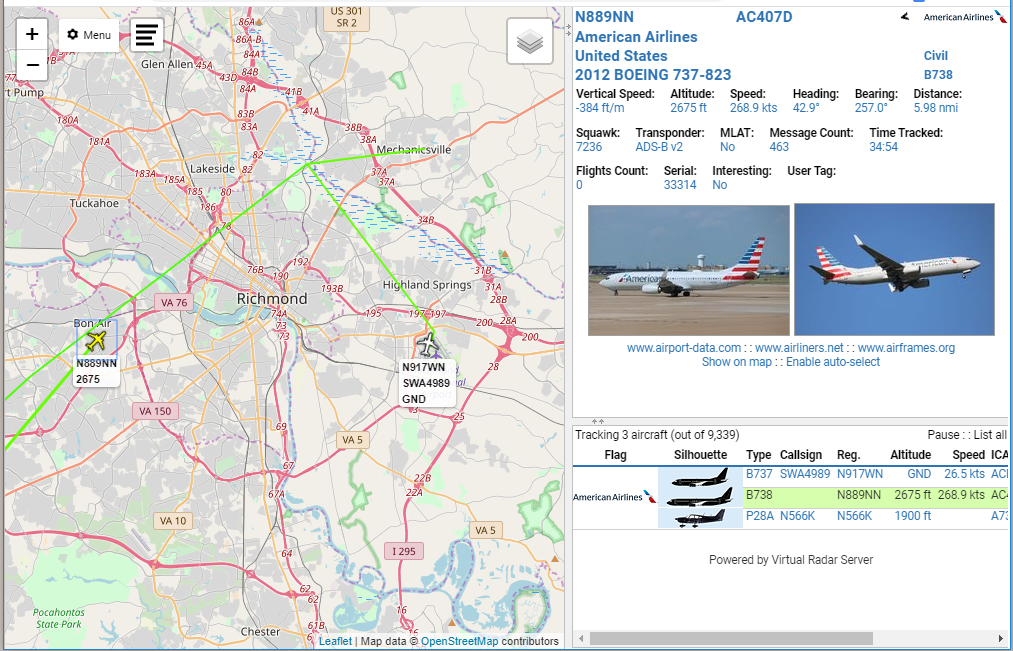
I’ve selected a random aircraft on the map and dragged the list up a little bit so you can see them. There’s a lot of info, including (sometimes) pictures of the actual aircraft, not just a stock photo.
The list shows some details of the currently tracked aircraft (note here that it’s 57 of 9707 in the screenshot). You can re-sort that list on any field.
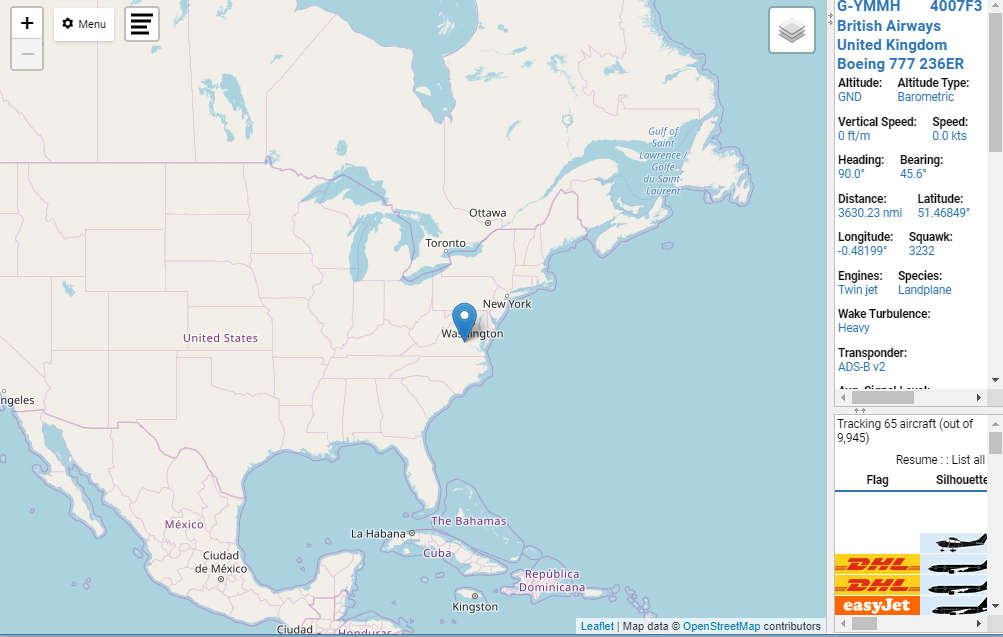
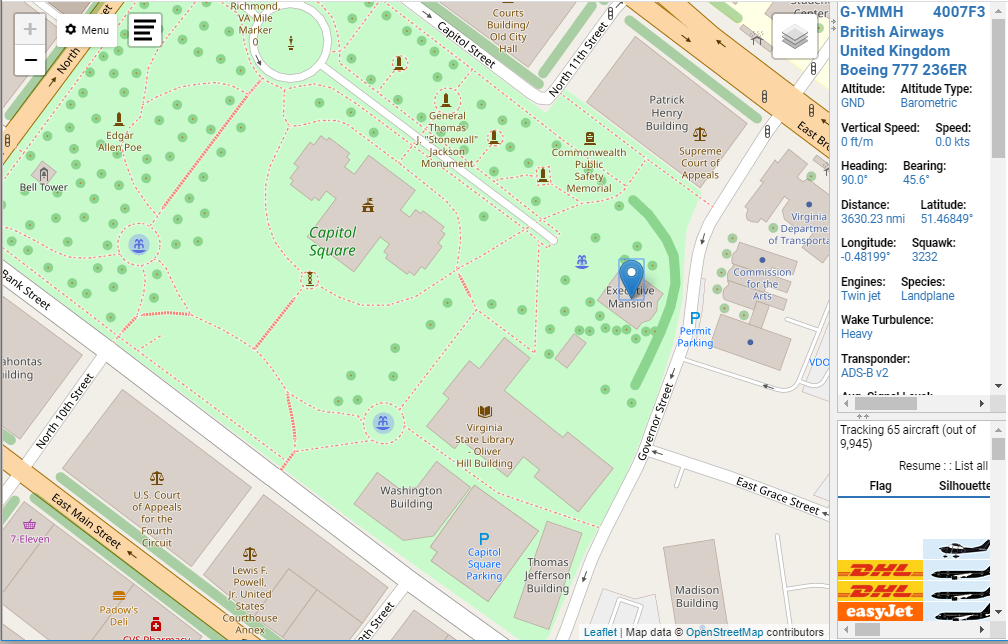
The first thing you want to do is set your location so you can calculate things like bearing and distance. We’ll use Richmond, VA because…why not. Drag the vertical divider to the right to make the map bigger if necessary:
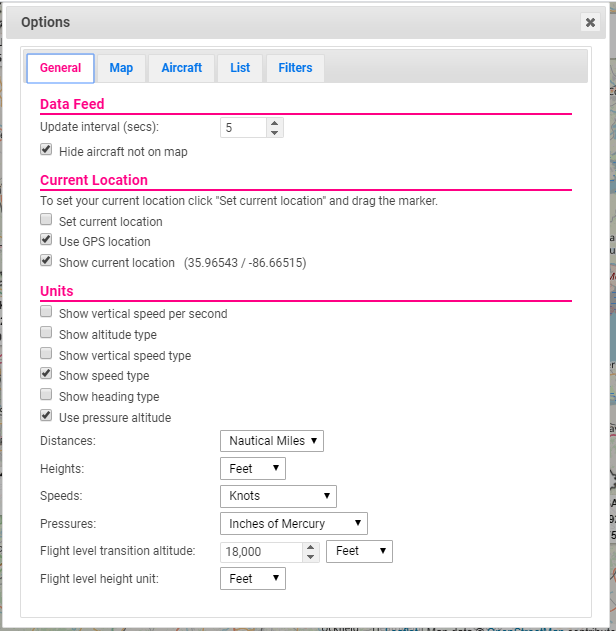
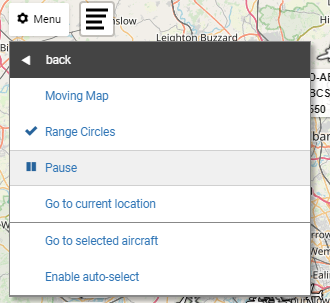
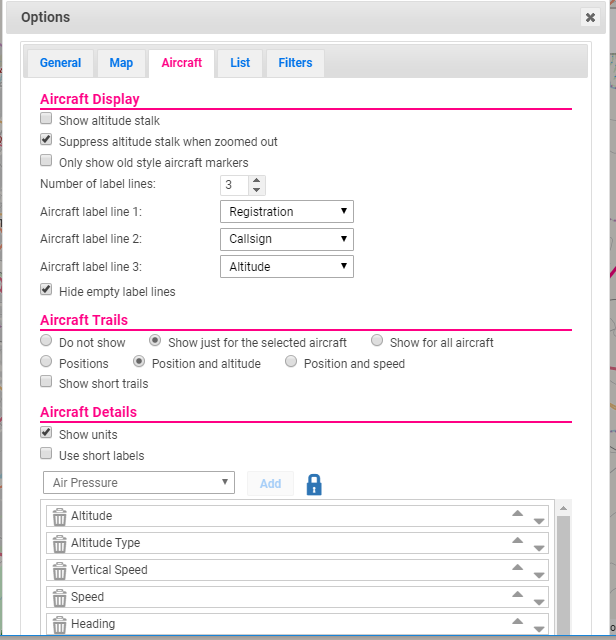
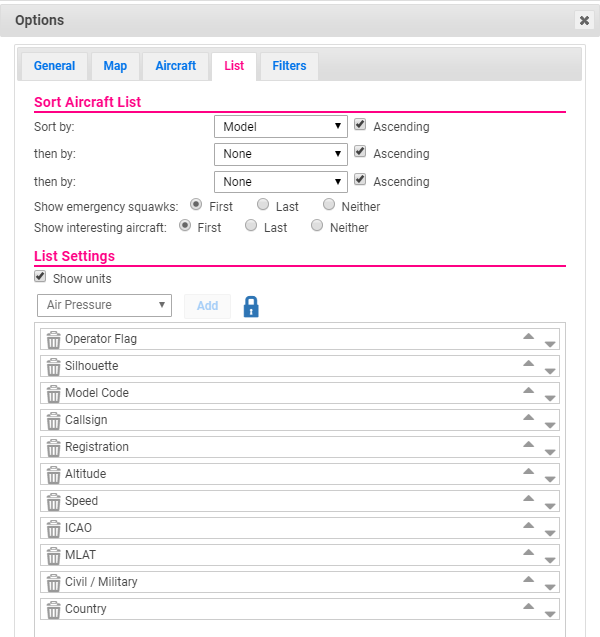
Now, most of the stuff we want to do is going to be in the “options” piece. To get there, you click on the Menu Icon and select “Options”
Which brings up the Options menu that has 5 tabs.
Make sure you never uncheck that “Hide aircraft not on map” box, because there can be upwards of 12,000 aircraft in the feed at once and your browser will crash if you try to load all those into memory every 5 seconds. You also don’t want to zoom too far out or you’ll run in to the same problem of having too many aircraft in memory. You can change the Update Interval to something longer than 5 seconds, but 5 seconds is the minimum available from ADSBExchange.
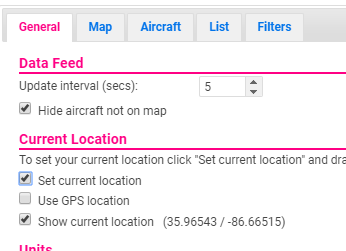
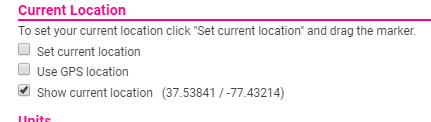
To move the map center, uncheck the “use GPS location” checkbox” (this setting doesn’t appear to work, even in my own installation of VRS at home) and check the “Set current location” checkbox
There is no “save” button on any of these screens. Options are automatically changed at the next refresh cycle, so in this case it’s within 5 seconds. To close out, click the X in the upper right corner of the Options dialog box.
Now we’re back at the main screen and there’s a blue Marker that marks the current location.
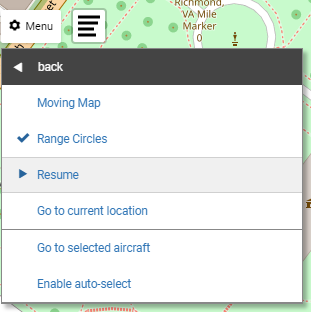
Click Menu and select “Shortcuts”, then select “Pause”
That will stop VRS from trying to load updates. Now you can zoom out without crashing your browser and move the marker. I am zoomed out to the maximum zoom level here:
Grab the marker with your mouse and move it. In my case, I have to move it west, then move the map, then move it again closer to Richmond
Step 1Step 2
Now zoom back in for fine-tuning. You can do your city for a generic idea of distances or you can plop the marker right on your house for really accurate readings. I’m going to put this on the Governor’s Mansion.
Now go back to the Options for General and uncheck the “Set current location” box. Leave the “Use GPS location” unchecked.
Close the Options dialog box and turn the feed back on by going back to Menu->Shortcuts and clicking “Resume”
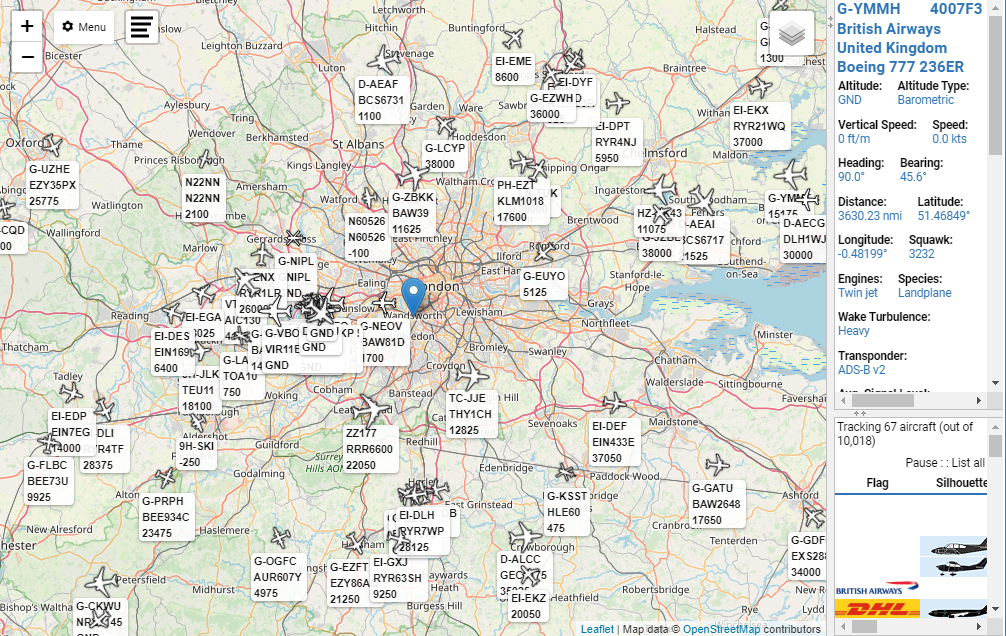
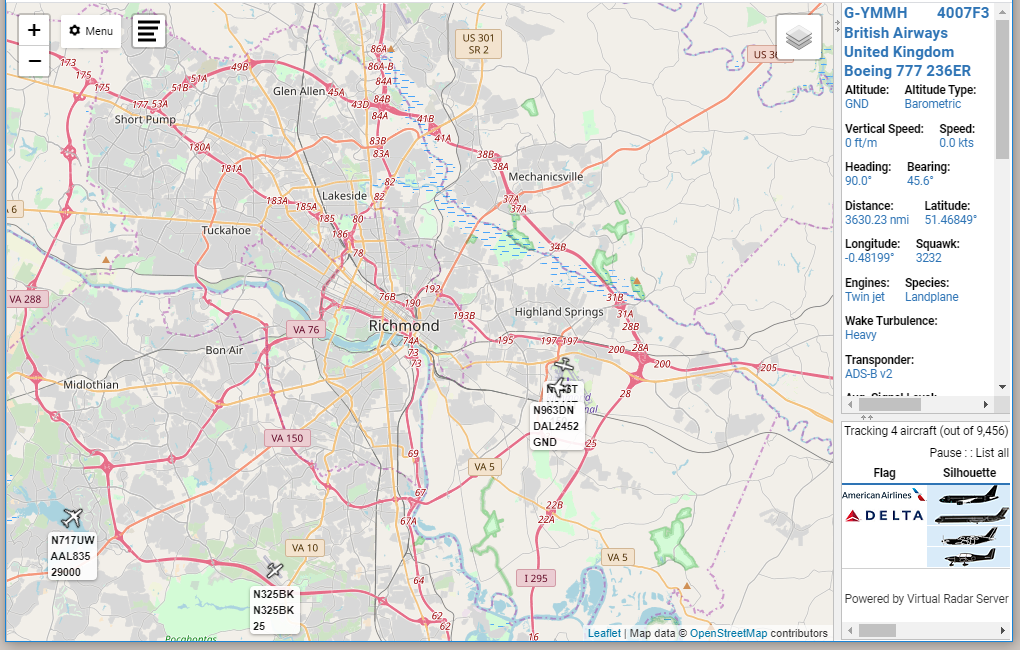
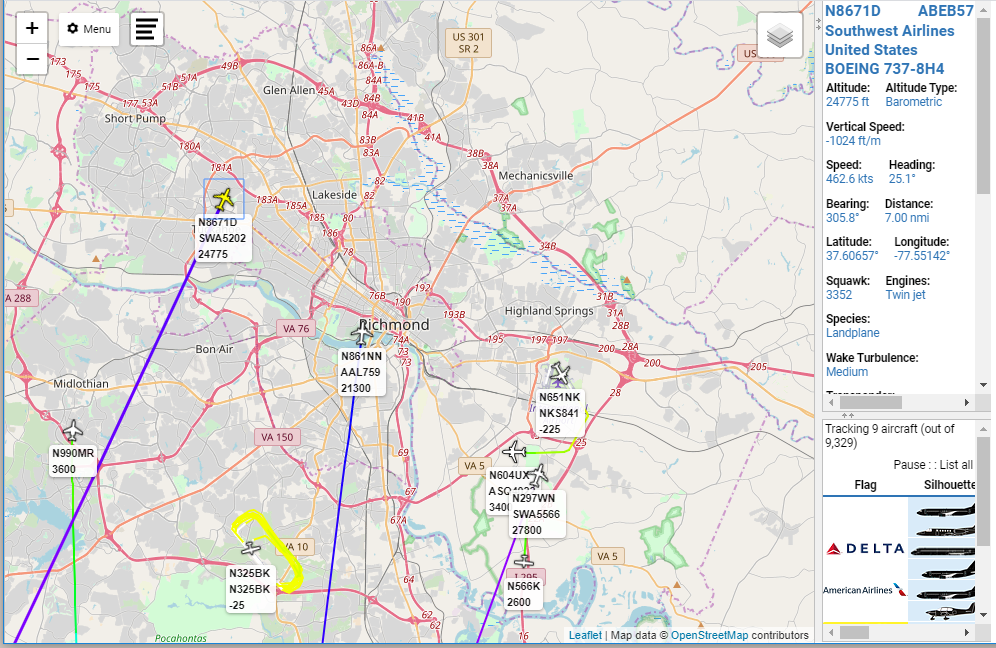
Now you can zoom out to a comfortable level and see some planes. It may take 30-60 seconds for aircraft to start showing up on your map, but zooming out to a metro-regional view usually gives good results
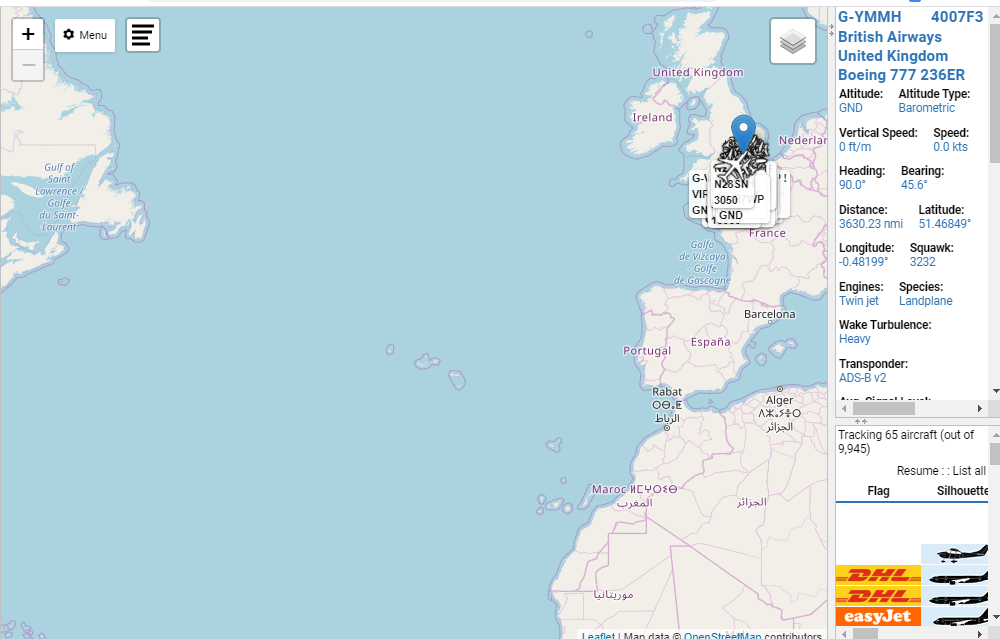
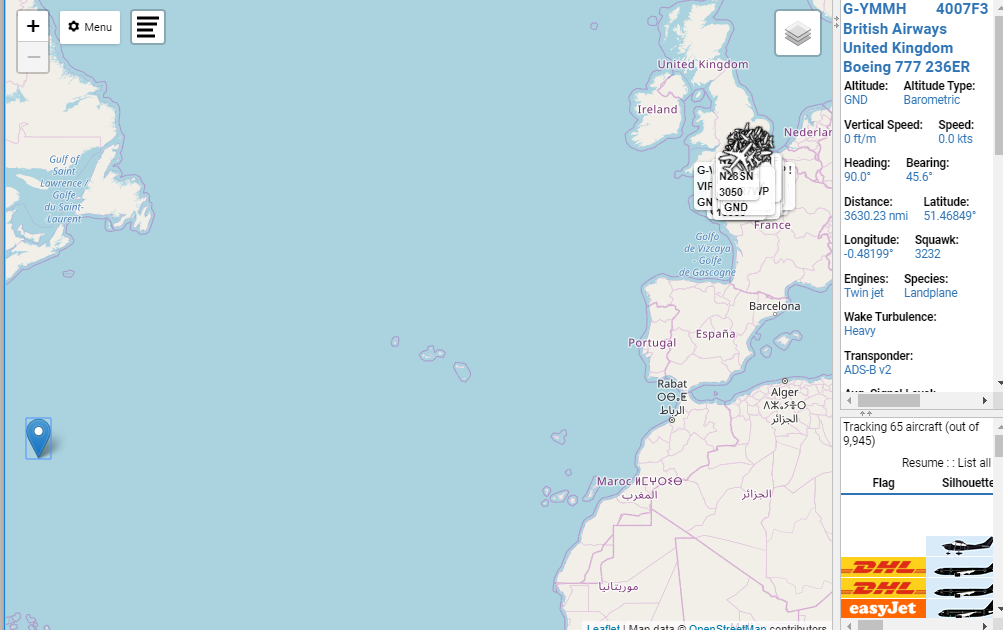
The aircraft info window (top right, remember?) still shows the British Airways jet I looked at earlier, so I’m going to switch it to something over here by clicking on one of the aircraft I can see.
The selected aircraft shows up in yellow, and now we can see an aircraft trail. I’ll be changing aircraft during these next few screenshots because they are going ~500mph and aren’t in my view for long, so don’t worry if it looks like data is changing…it is.
Personally, I like to see trails of all aircraft I can see. This is another reason why I never uncheck the “Hide Aircraft not on map” box. So let’s change that. Go back to the Options, and pick the Aircraft tab:
Lots of stuff going on here, but what we want to do is under the “Aircraft Trails” section, check the radio button for “Show for all aircraft” and then close out the dialog box:
Still not a lot going on over Richmond, but hey look! Now we can easily see that there’s a small plane doing touch-and-goes at an airport south of Richmond. The different colors of the trails correspond to the different altitudes. Yellow is very close to the ground, then it goes to green and cyan and purple and red for 40,000ft or higher. It’s a very good visual indication of what’s going on.
Next, let’s look at the aircraft themselves.
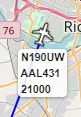
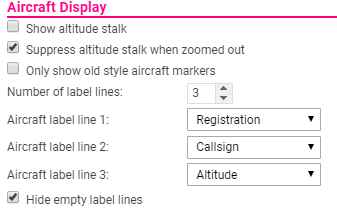
If you look back at the Aircraft tab under Options, that first section was for the Aircraft Display. That’s what this is referring to.
So the marker above is showing that a jetliner with the FAA Registration “N190UW” is transmitting a callsign of “AAL431” and is at 21,000FT. I keep these at the default, but you can play around with them and select whatever you want. You may notice in earlier screenshots that the small plane doing training show an altitude of -25ft. That’s because the default altitude transmitted is pressure altitude based off of standard pressure conditions. The plane is not actually 25ft below ground 🙂
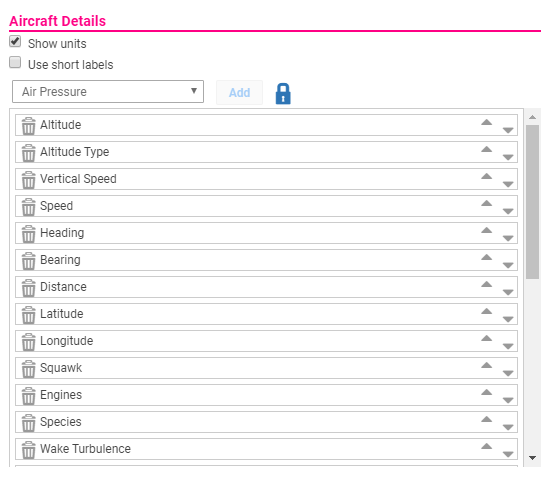
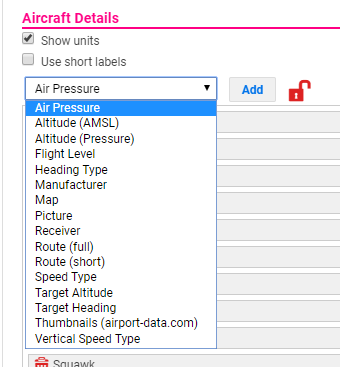
On the same Aircraft tab inside of Options, you can change what data is displayed, and in what order, in the Aircraft Info window there on the top right. To change things, you have to click the blue lock to change it to a red unlocked lock, then you can move things around, add, or remove them, etc.
It’s fairly straightforward. Data items are removed from the dropdown as you add them to the Aircraft Info window so you cannot add the same specific item twice. Do understand, however, that some items are duplicates. The “Pictures” item and the “Thumbnails” item will show the exact same picture, only smaller for the Thumbnails. There is also a “Pictures or Thumbnails” item, so you could potentially have the same pictures show up three times if you select all three.
I’m going to remove a bunch of stuff from the list that I don’t care much about–Wake Turbulence, for example, doesn’t matter much to me on the ground. I also like to re-arrange the way the order so that I group like-items together. You can re-arrange the order by drag-and-drop, as long as the lock is unlocked.
Once the list is locked, you can close the Options dialog and re-size the Aircraft Info window to make things fit a little better:
We can do something similar with the Aircraft List, which actually has a lot more of those “thing 1 & thing 2” fields to compress the amount of data.
Go back to Options, and pick the List tab:
I always change the Sort By to Distance, but you do you.
Okay you see how “Operator Flag” and “Silhouette” are separate fields? It takes up a TON of real estate to do that, so I always remove those and replace them with the “Op. & Sil.”
Versus:
The amount of info can get out of hand pretty quickly, so for readability try to stay with the minimum amount of info that you thing will add value. I like to have the Model (not Model Code for beginners) in the list but it can get really wide. Callsign is usually the actual flight number for commercial flights, the registration number for private flights, or the military callsign for military flights.
Okay one last thing: Filters.
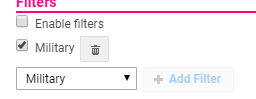
VirtualRadarServer has some pretty awesome filters built in. Go back to Options and hit the Filters tab
You can include or exclude by all of those fields. “Airport” is the ICAO airport code present in the Route information, and if you don’t really know what that means you probably should just ignore that. ICAO here is the MODE-S address of the transponder which, again, if you don’t understand what that means you probably shouldn’t use it. I’ll probably do another post just on ICAO codes, what they are, how to find them, etc.
A super easy one is “Military” so I’ll walk you through that. Select Military from the dropdown and click “Add Filter”
When you check the “Enable filters” box, the only aircraft displayed will be aircraft marked as Military in the database. If you enable filters and uncheck the Military box, then only non-military aircraft will be displayed. That’s something that gets people sometimes. Check the Enable filters box and go back to your map.
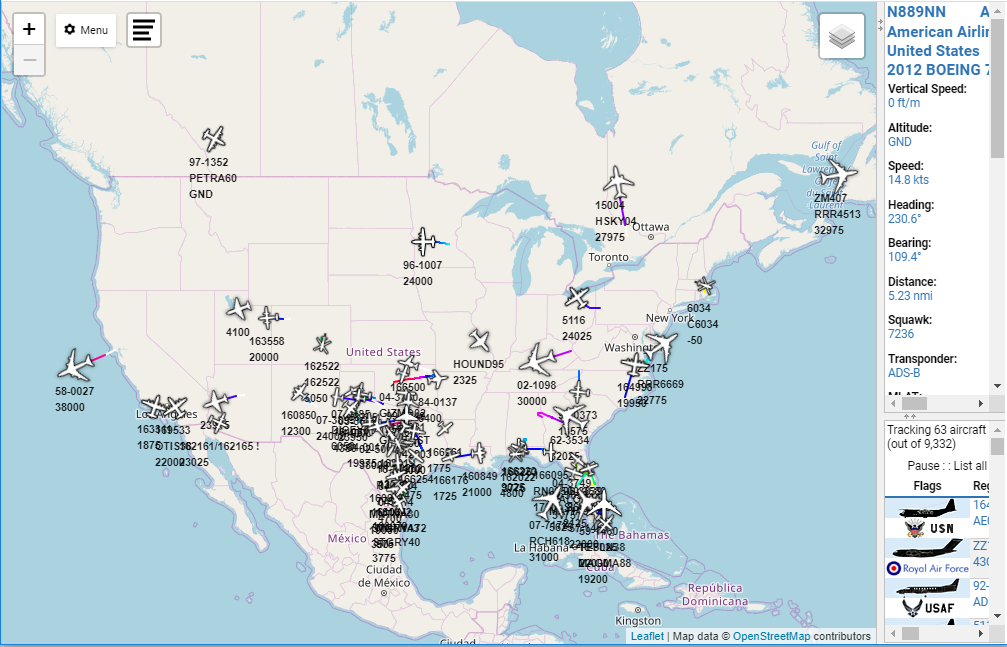
Now you can zoom WAAAAAAY out and see all the military aircraft that are in ADSBExchange’s feed!
You can do the same for a specific registration or callsign if you want to track a flight across the country and don’t want to have to constantly move the map around to limit the number of aircraft in view. As you can see here, I’m only displaying 63 aircraft while viewing the entire country and it’s not a problem.
A note on Military Aircraft: You’re not going to see drones or B2s or F22s or anything combat-related like that. They have the ability to turn off ADS-B if they want, and ADS-B is not radar.
Play around with it, but also understand that there’s a timeout. You can only use it for, I think, 30 minutes before it will log you off, so you can’t just throw it up on a monitor and watch traffic all day. It’s also limited in that it receives feeds from other stations, so if there’s nothing in your area feeding it, you won’t get good results. If you find that to be true, it’s super easy to set up your own receiver and start feeding them data, and I would encourage you to do that.
Have fun! It’s rather addicting if you like planes!
Four days from now, on Monday, January 20th, 2020, the Virginia Citizens’ Defense League is holding their annual Lobby Day at the Virginia State Capitol in Richmond, VA.
There has been a lot of…contentiousness this year. Among other things, the Governor has declared a state of emergency and (probably unlawfully) declared the State Capitol grounds a gun-free zone.
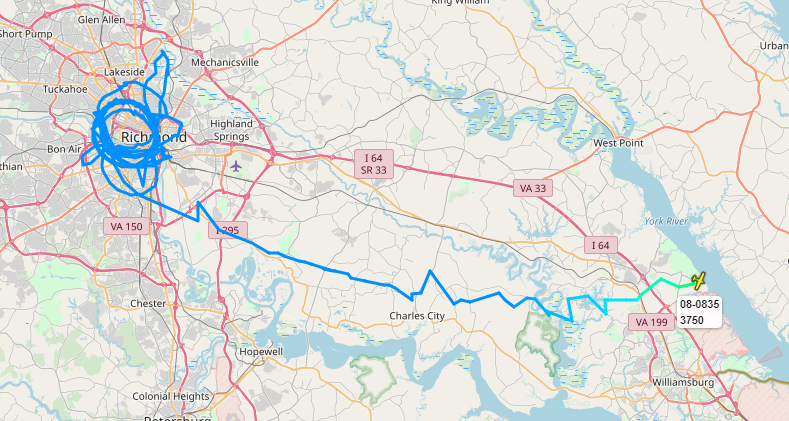
I say that, because of this: At this hour, there is a USAF U-28A aircraft circling the Capitol.
The U-28A is a modified, single-engine Pilatus PC-12 aircraft and is part of the Air Force Special Operations Command manned, airborne intelligence, surveillance, and reconnaissance fleet. Operational squadrons include the 319th, 34th and 318th Special Operations Squadrons, and the 5th and 19th SOS conduct the airframe’s formal training.
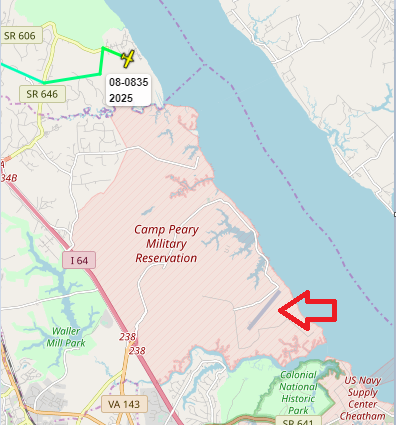
It circled that area for about two hours before flying east-southeast towards Yorktown Naval Weapons Station.
The jagged lines are due to the aircraft signals being picked up by different receivers
Once the altitude dropped below 2000FT MSL, I lost it.
Probable airstrip landing location
Honestly, I had never heard of Camp Peary, but because I love you guys I wanted to look up what was there.
Why? Why must you make me think like a conspiracy theorist?
So, good luck, fellow citizens! Your participation will be recorded in your permanent record!
UPDATE1/18/2019 The aircraft appears to have left the area the day after I watched it circle Richmond. I did not see it leave, but it was tracked by RadarBox24 leaving the area around noon local time:
I recently took a class where several of the guys had them. In fact, all of the “professional” competition shooters were wearing them (or custom molded in-ear plugs that had to be removed during instruction blocks), and they all spoke very highly of them.
I looked at them last year, but $300 was a little too much for me to swallow. Today, though, you can get them for $199 on Amazon. I have no idea how long that will last, or why that listing is $199 but this one is $249.
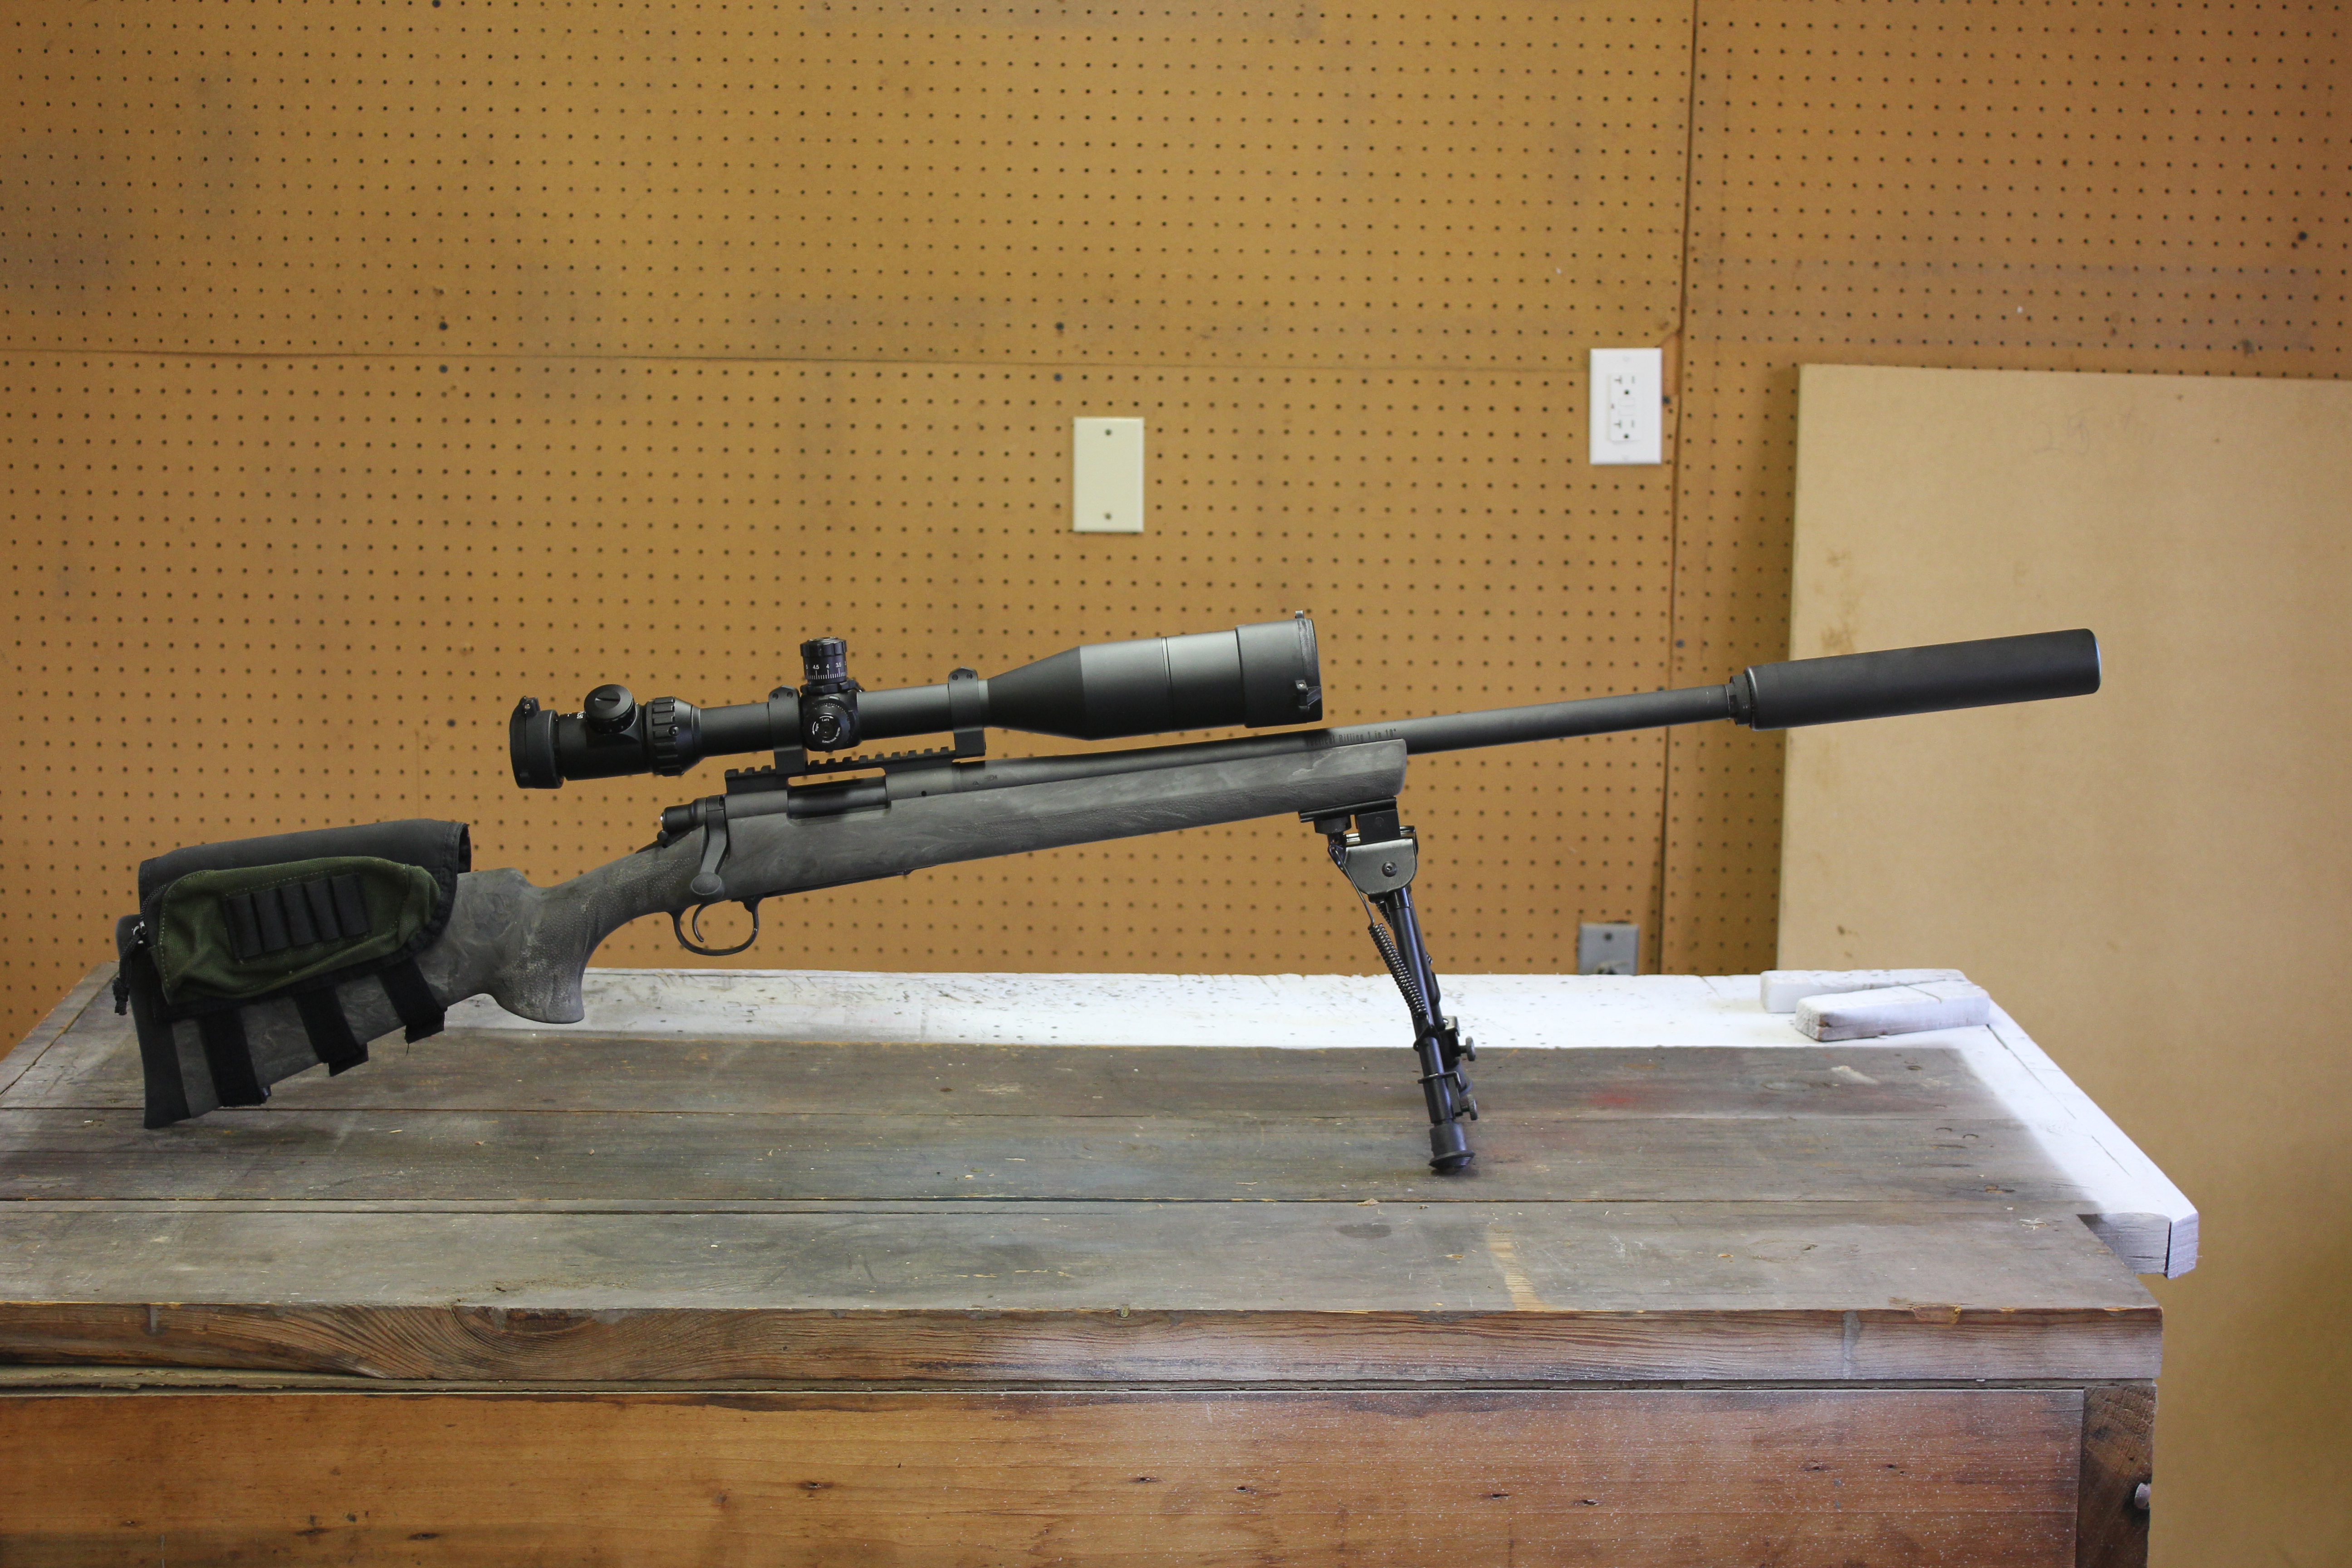
I’ve been using the Impact Sport muffs that everyone and their mother has had since 2016, but now that I’m way more in to bolt guns I need something that doesn’t interfere with my crazy-low cheekweld I naturally want to have.